↧
Experimenting with Neural Networks – Part 3
↧
Easily Make Asynchronous REST Calls In Delphi 10.2.1 Tokyo On Android, iOS, macOS, and Windows 10

The Hospitality Survey App template contains a RAD Server project and a Delphi client project. You can download the Hospitality Survey App template code for yourself from Embarcadero's GetIt. The Delphi client project makes REST calls via the BaaS components to RAD Server. Keep in mind that this same source code will work with TRESTClient and TNetHTTPClient. It is beneficial for the REST calls to be made in an asynchronous way because the interface stays responsive and on some platforms like Android it is required that HTTP calls are made asynchronously.
There are quite a few different ways to achieve asynchronous calls using the various libraries and functionality built into Delphi 10.2.1 Tokyo. The below source code is one way to make asynchronous calls that I found which worked for me. It uses the Parallel Programming Library with it's TTask object in this case. If you're interested in more on how TTask works check out this tutorial as well. It includes examples of pausing and canceling tasks.
In the below code a TTask is used to create a thread where the BackendEndpointGet component calls it's Execute method. The BackendEndpointGet.Tag property is used to store whether the BackendEndpointGet component is in use or not (BUSY or NOT_BUSY) so that two calls can not be made on the same component at the same time. The activity dialog is show prior to starting the Task. The Execute method is synchronous but it is inside of the Task so it doesn't block the app UI and the activity dialog displays nicely over it. Once the Execute method completes the code checks that the response code from the call is the HTTP 200 code. If it is then is proceeds to save out the contents of the response to a JSON file. TThread.Synchronize() is then used to make sure that any changes to the UI take place within the main thread. In this case the JSON file is loaded into a TFDMemTable and then the dynamic survey form is built using the GenerateSurvey() procedure from the contents of the TFDMemTable.
After all of the data is loaded or an exception is encountered the activity dialog is hidden again and the hide activity dialog procedure is within a TThread.Synchronize call as well so that the changes to the UI are main from within the main thread.
As I previously started there are a lot of different ways to do this but this is one way I found that worked for me. Check out the source code below!
//
//
  const
    BUSY = 1;
    NOT_BUSY = 0;
//
procedure TMainForm.TakeSurveyActionExecute(Sender: TObject);
var
  SL: TStringList;
begin
  if BackendFrame.BackendEndpointGet.Tag = NOT_BUSY then
  begin
    BackendFrame.BackendEndpointGet.Tag := BUSY;
    ShowActivity;
    ITask(TTask.Create(
      procedure
      begin
        try
          BackendFrame.BackendEndpointGet.Execute;
          if BackendFrame.BackendEndpointGet.Response.StatusCode = 200 then
          begin
            SL := TStringList.Create;
            SL.Text := BackendFrame.BackendEndpointGet.Response.Content;
            SL.SaveToFile(SettingsFilePath + 'surveys.json');
            SL.Free;
            TThread.Synchronize(nil,
              procedure
              begin
                FDMemTableForm.LoadFromFile(SettingsFilePath + 'surveys.json', sfJSON);
                FDMemTableForm.Open;
                FDMemTableForm.First;
                SurveyVSB := TVertScrollBox.Create(Self);
                SurveyVSB.Parent := SurveyTabItem;
                SurveyVSB.Align := TAlignLayout.Client;
                GenerateSurvey(SurveyVSB);
                ChangeTabAction.Tab := SurveyTabItem;
                ChangeTabAction.ExecuteTarget(Self);
              end);
          end;
        finally
          TThread.Synchronize(nil,
            procedure
            begin
              HideActivity;
            end);
          BackendFrame.BackendEndpointGet.Tag := NOT_BUSY;
        end;
      end)).Start;
  end;
end;
Read More
↧
↧
To get the NetworkInfo using the ConnectivityManager of Android
Using ConnectivityManager with C++Builder
With C++Builder 10.2 Tokyo Android ConnectivityManager class is available.
Use the ConnectivityManager, you can get NetworkInfo.
NetworkInfo see various network information.
inside that, The getType() function is Reports the type of network.
The getType() function return is int.
| int | type |
|---|---|
| 0x00000000 | TYPE_MOBILE |
| 0x00000001 | TYPE_WIFI |
| 0x00000006 | TYPE_WIMAX |
| 0x00000009 | TYPE_ETHERNET |
| 0x00000007 | TYPE_BLUETOOTH |
I tried ways to get NetworkInfo.
Declare _di_JConnectivityManager variable.
_di_JConnectivityManager is the ConnectivityManager class interface.
It creates to use '_di_JConnectivityManager'.
Get the _di_JNetworkInfo using the getActiveNetworkInfo() function.
You can get the status of a network interface.
Read More
↧
Talking at ITDevCon 2017, Tomorrow
The conference is organized by Embarcadero partner BitTime and their consulting company BitTime Professionals at their office in Franscati, near Rome, and all of the information is at:
Well, it might be a little late to join, but I realized I forgot mentioning the event on my blog, so here it goes. If you plan attending, I'll be there tomorrow afternoon and also join the dinner. See the final agenda at http://www.itdevcon.it/agenda
I'll be giving a keynote on the status of RAD Studio, but also two technical sessions covering FireDAC CData Enterprise connectors and offering an introduction to Sencha's ExtJS and Architect tool, along with demos of integration with Delphi powered back ends. Would be interesting, and I'll make sure to share my demos with everyone -- and possibly repeating them at the coming CodeRage online conference next month.
Read More
↧
Join Andrea Magni in Millan for a Special ExtJS Event

 A special event combining Delphi and Ext JS is coming with Embarcadero MVP Andrea Magni in Milan this October 26th.
- Are you a Delphi developer looking for a modern web solution?
- Would you like to offer a web user interface as effective as your desktop application’s one?
- Is a mobile web app suitable to your needs instead of taking the complexity of build and distribute native mobile apps?
- Are you looking for a new technology to upgrade your existing web proposal?
Delphi has been and still is a referring point in the area of data-centric business applications, thanks to its high performance and wide data access capabilities. It offers a first-rate support for the Windows platform and with the recent addition of the ability to reach other desktop platforms like Mac OS X and Linux.
What are you waiting for? Let’s try Delphi and ExtJS together: the ultimate usable modern web solution.
ExtJS helps you in building data-intensive, cross-platform web apps for desktops, tablets, and smartphones, with a customized and user-friendly interface. Thanks to all these features you can make your users feel the same experience of your Desktop App in a new Web App.
 Structure and usability are the both ExtJs and Delphi strengths. If you share the same mindset, let’s come and discover how to integrate Delphi with ExtJs, step by step. A hands-on event with two specialists, each side: Andrea Magni, Embarcadero Delphi MVP, and Federico Baron, ExtJs Expert.
MORNING SCHEDULE:
- Introducing Federico Baron and Andrea Magni
- Introducing Delphi and ExtJs with Case Studies
- Trial: “How to integrate Delphi with ExtJs, step by step!”
- Objectives, results and further developments
EVENT INFORMATION:
Ibuildings c / o Regus
Santa Maria Valle 3
Milan, MI
Italy
26 of October


Read More
↧
↧
Adding a Custom Icon to a FireMonkey Button

In today's blog post, I am outlining how to create custom FireMonkey buttons. In this case, I am using the blue Windows 10 style included in RAD Studio 10.2 Tokyo.
Read More
↧
Experimenting with Neural Networks – Part 4
↧
Experimenting with Neural Networks – Part 5
↧
Robert “Uncle Bob” Martin is Speaking at CodeRage XII

Here in the Delphi community, we all know Dr. Bob Swart, and CodeRage wouldn’t be complete without him (he has a session this year on Customizing DataSnap Method Output, don’t worry.). This year we are also hearing from Uncle Bob, the author of Clean Code – A Handbook of Agile Software Craftsmanship. This is one of those “must reads” that all software developers should have on their bookshelf.
I had an opportunity to see Uncle Bob speak a few years ago, and it was very memorable. This session will be like no others you’ve seen. He is speaking on “The Clean Coder – An Introduction to Software Professionalism.” His session and the live Q&A will be available only during the live CodeRage session, so be sure to join Uncle Bob for this amazing session!
Register now!


Read More
↧
↧
Implementing AJAX and JSONP Support in RAD Server for ExtJS
Idera recently acquired Sencha (https://www.sencha.com/) and has added the company products to the Embarcadero business unit, which produced RAD Studio and also the RAD Server web service technology. A natural question arises on how to use the two products together. While there are several options, in this blog post I want to highlight the simple and direct integration of RAD Server and FireDAC with an ExtJS client based on Sencha’s data model architecture. Most of the considerations in this blog post would equally apply to using WebBroker or DataSnap to build the web service..
A Simple Test
As first step, I’ve created a simple blank RAD Server application. What this does is to expose standard REST endpoints like “version”. In an ExtJS client build with the Architect IDE, I’ve added a button, picked the Tap event, and written code like the following:
onButtonTap: function(button, e, eOpts) { Ext.Ajax.request({ url: 'http://192.168.1.102::8080/version', cors: true, success: function(response, opts) { var obj = Ext.decode(response.responseText); console.dir(obj); button.setText (obj.server); }, }); }What this code does is make a call to the version REST API, create a JavaScript object with the resulting JSON (decode), display the data on the browser console, and display the server field as button text.
Defining a Data Model
This just proves that the JavaScript application can invoke RAD Server. Next I moved to the data processing. ExtJS has the concept of a data model, so using the visual tool I created a simple one like the following:
Ext.define('MyEmployeeApp.model.EmployeeData', { extend: 'Ext.data.Model', requires: [ 'Ext.data.field.Field' ], fields: [ { name: 'first_name' }, { name: 'last_name' }, { name: 'phone_ext' }, { name: 'dept_no' }, { name: 'job_country' } ] });Returning JSON from RAD Server
Next, I had to define a data store. First I used an AJAX data store and to keep things simple I wrote a custom method in RAD Server to expose a plain JSON data structure, built using the TJSONObject and TJSONArray classes. In this code EmployeeTable is a TFDQuery dropped in the data module along with a connection to the classic InterBase employee demo database:
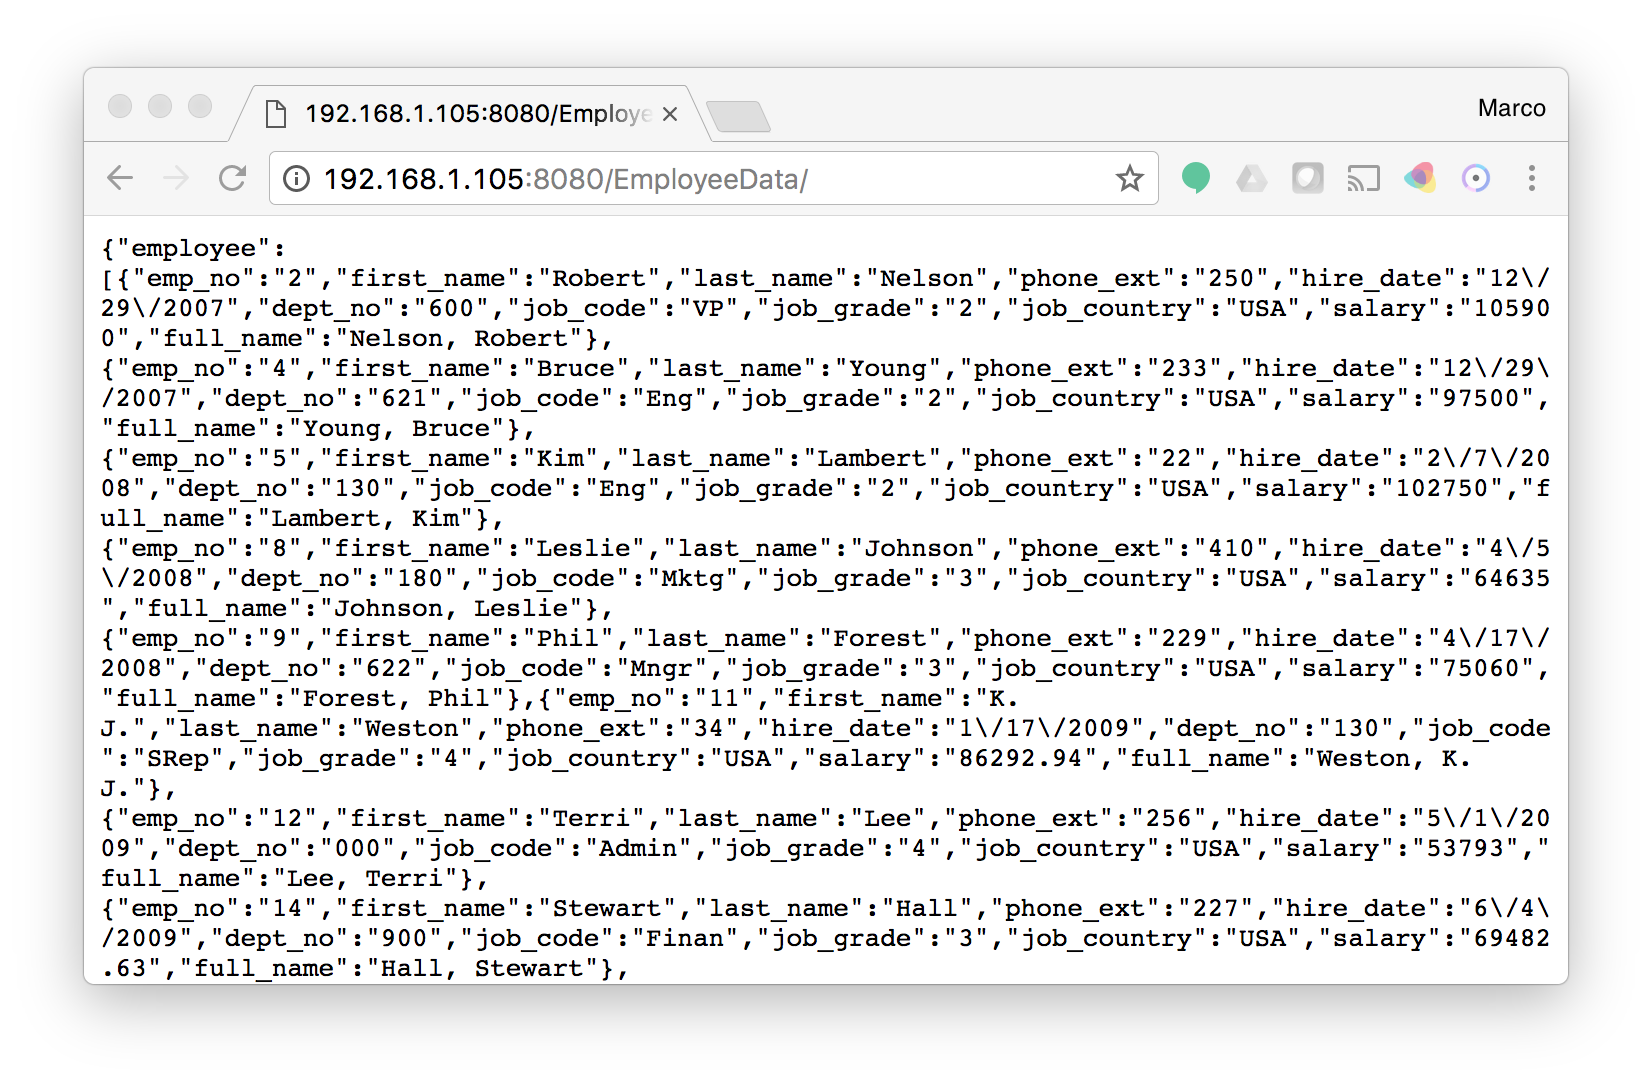
procedure TEmployeeDataResource1.Get(const AContext: TEndpointContext; const ARequest: TEndpointRequest; const AResponse: TEndpointResponse); var empDataObj: TJSONObject; data: TDataSet; emplArray: TJSONArray; emplObj: TJSONObject; aField: TField; begin data := EmployeeTable; data.Open; empDataObj := TJSONObject.Create; emplArray := TJSONArray.Create; while (not data.EOF) do begin emplObj := TJSONObject.Create; for aField in data.Fields do begin emplObj.AddPair(LowerCase(aField.FieldName), aField.AsString); end; emplArray.Add(emplObj); data.Next; end; empDataObj.AddPair ('employee', emplArray); AResponse.Body.SetValue(empDataObj, True); end;This is the resulting JSON in a browser:
With this code and the use of an AJAX call, the JavaScript application by default ends up with with cross-server invocation security problems, when executed in the browser. There is however a fairly simple solution in RAD Server, which is set a single line in the EMS.INI file, with a configuration like:
[Server.APICrossDomain] ;# Write here the domains allowed to call the API. Used for Cross-Domains CrossDomain=*This is fairly over-permissive, in production you’d want to indicate a specific domain rather than *. With this setting and possibly even some proxy configuration in your web server, you can handle the cross-domain resource access.
Implementing JSONP in RAD Server
The alternative options (a little older and considered less secure) is to implement a JSONP server. You can read the documentation here: http://docs.sencha.com/extjs/6.5.2/modern/src/JsonP.js-1.html.
In short, rather than returning JSON data, a JSONP call returns the JavaScript source code of a function that includes the JSON text as a parameter. The name of the function to call is passed in a parameter named “callback” in a regular GET HTTP call. A common implementation is to check for that parameter and return JSONP (that is, JavaScript) in the specific case, JSON if the parameter is not present. It actually takes less time to read the code than the description. In the code above, the last line becomes:
var callBackParam: string; strStream: TStringStream; begin ... // check for JSONP request if ARequest.Params.TryGetValue ('callback', callBackParam) then begin strStream := TStringStream.Create ( callBackParam + '(' + empDataObj.ToString + ');'); AResponse.Body.SetStream(strStream, 'text/javascript', True); end else AResponse.Body.SetValue(empDataObj, True); end;Defining Storage in ExtJS
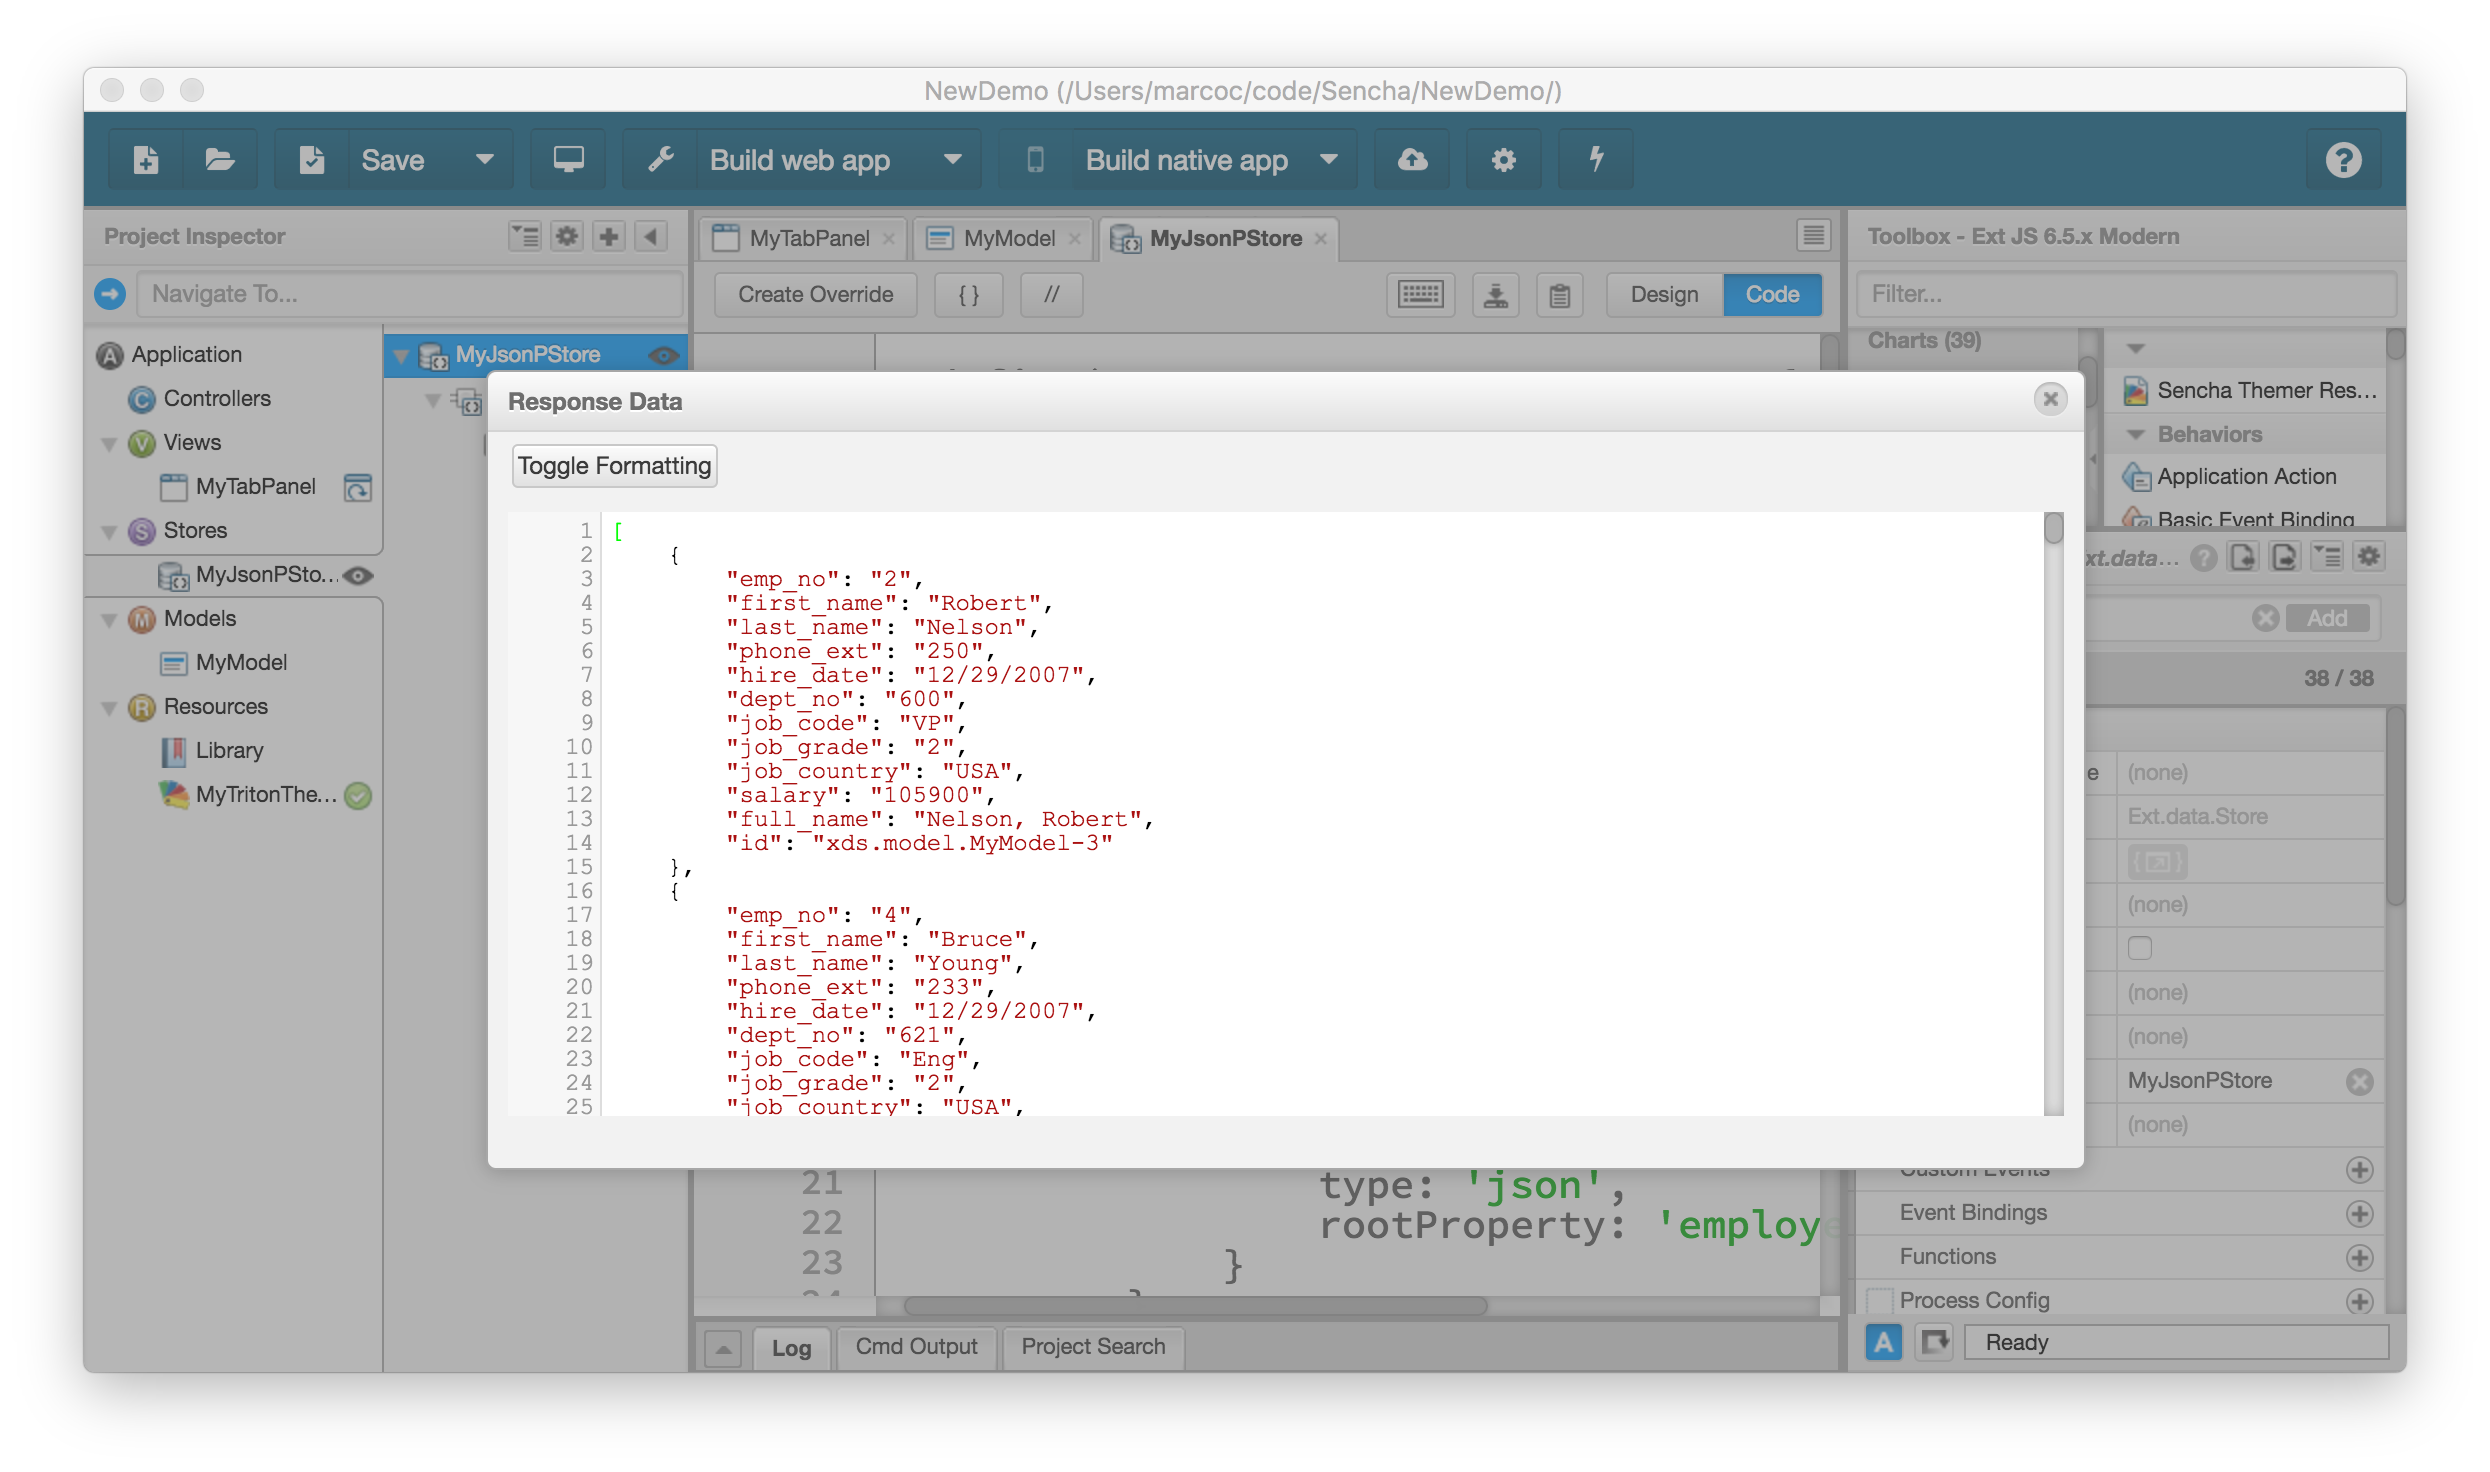
Now that we have a proper source of either JSON or JSONP data (both work at the same URL), we can define a data storage for them in ExtJS. Again, using Architect this can be done by setting a few properties, and here is the resulting code for AJAX:
Ext.define('MyApp.store.MyJsonStore', { extend: 'Ext.data.Store', requires: [ 'MyApp.model.MyModel', 'Ext.data.proxy.Ajax', 'Ext.data.reader.Json' ], constructor: function(cfg) { var me = this; cfg = cfg || {}; me.callParent([Ext.apply({ storeId: 'MyJsonStore', autoLoad: true, model: 'MyApp.model.EmployeeData', proxy: { type: 'ajax', url: 'http://192.168.1.102:8080/EmployeeData/', reader: { type: 'json', rootProperty: 'employee' } } }, cfg)]); } });The rootProperty is the name of the core JSON object, under which there is the actual data. It could be a more complex and nested sequence. With this configuration, you can use the Architect IDE to load the data and preview it:
The configuration of a JSONP data store is very similar, as listed below:
Ext.define('MyEmployeeApp.store.MyJsonPStore', { extend: 'Ext.data.Store', requires: [ 'MyEmployeeApp.model.EmployeeData', 'Ext.data.proxy.JsonP', 'Ext.data.reader.Json' ], constructor: function(cfg) { var me = this; cfg = cfg || {}; me.callParent([Ext.apply({ storeId: 'MyJsonPStore', model: 'MyEmployeeApp.model.EmployeeData', proxy: { type: 'jsonp', url: 'http://192.168.1.102:8080/EmployeeData/', reader: { type: 'json', rootProperty: 'employee' } } }, cfg)]); } });An EXtJS Grid for the UI
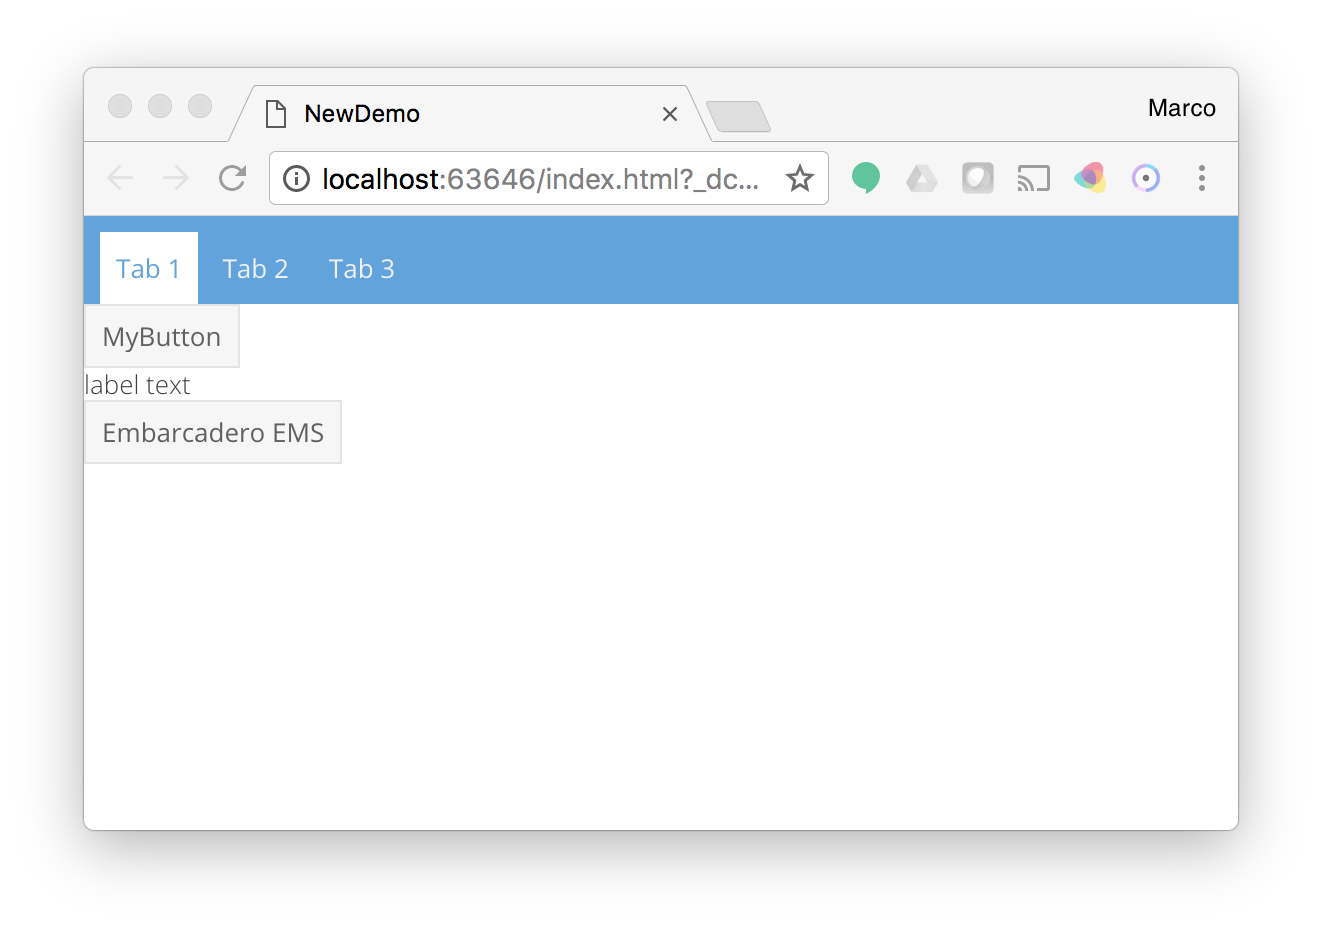
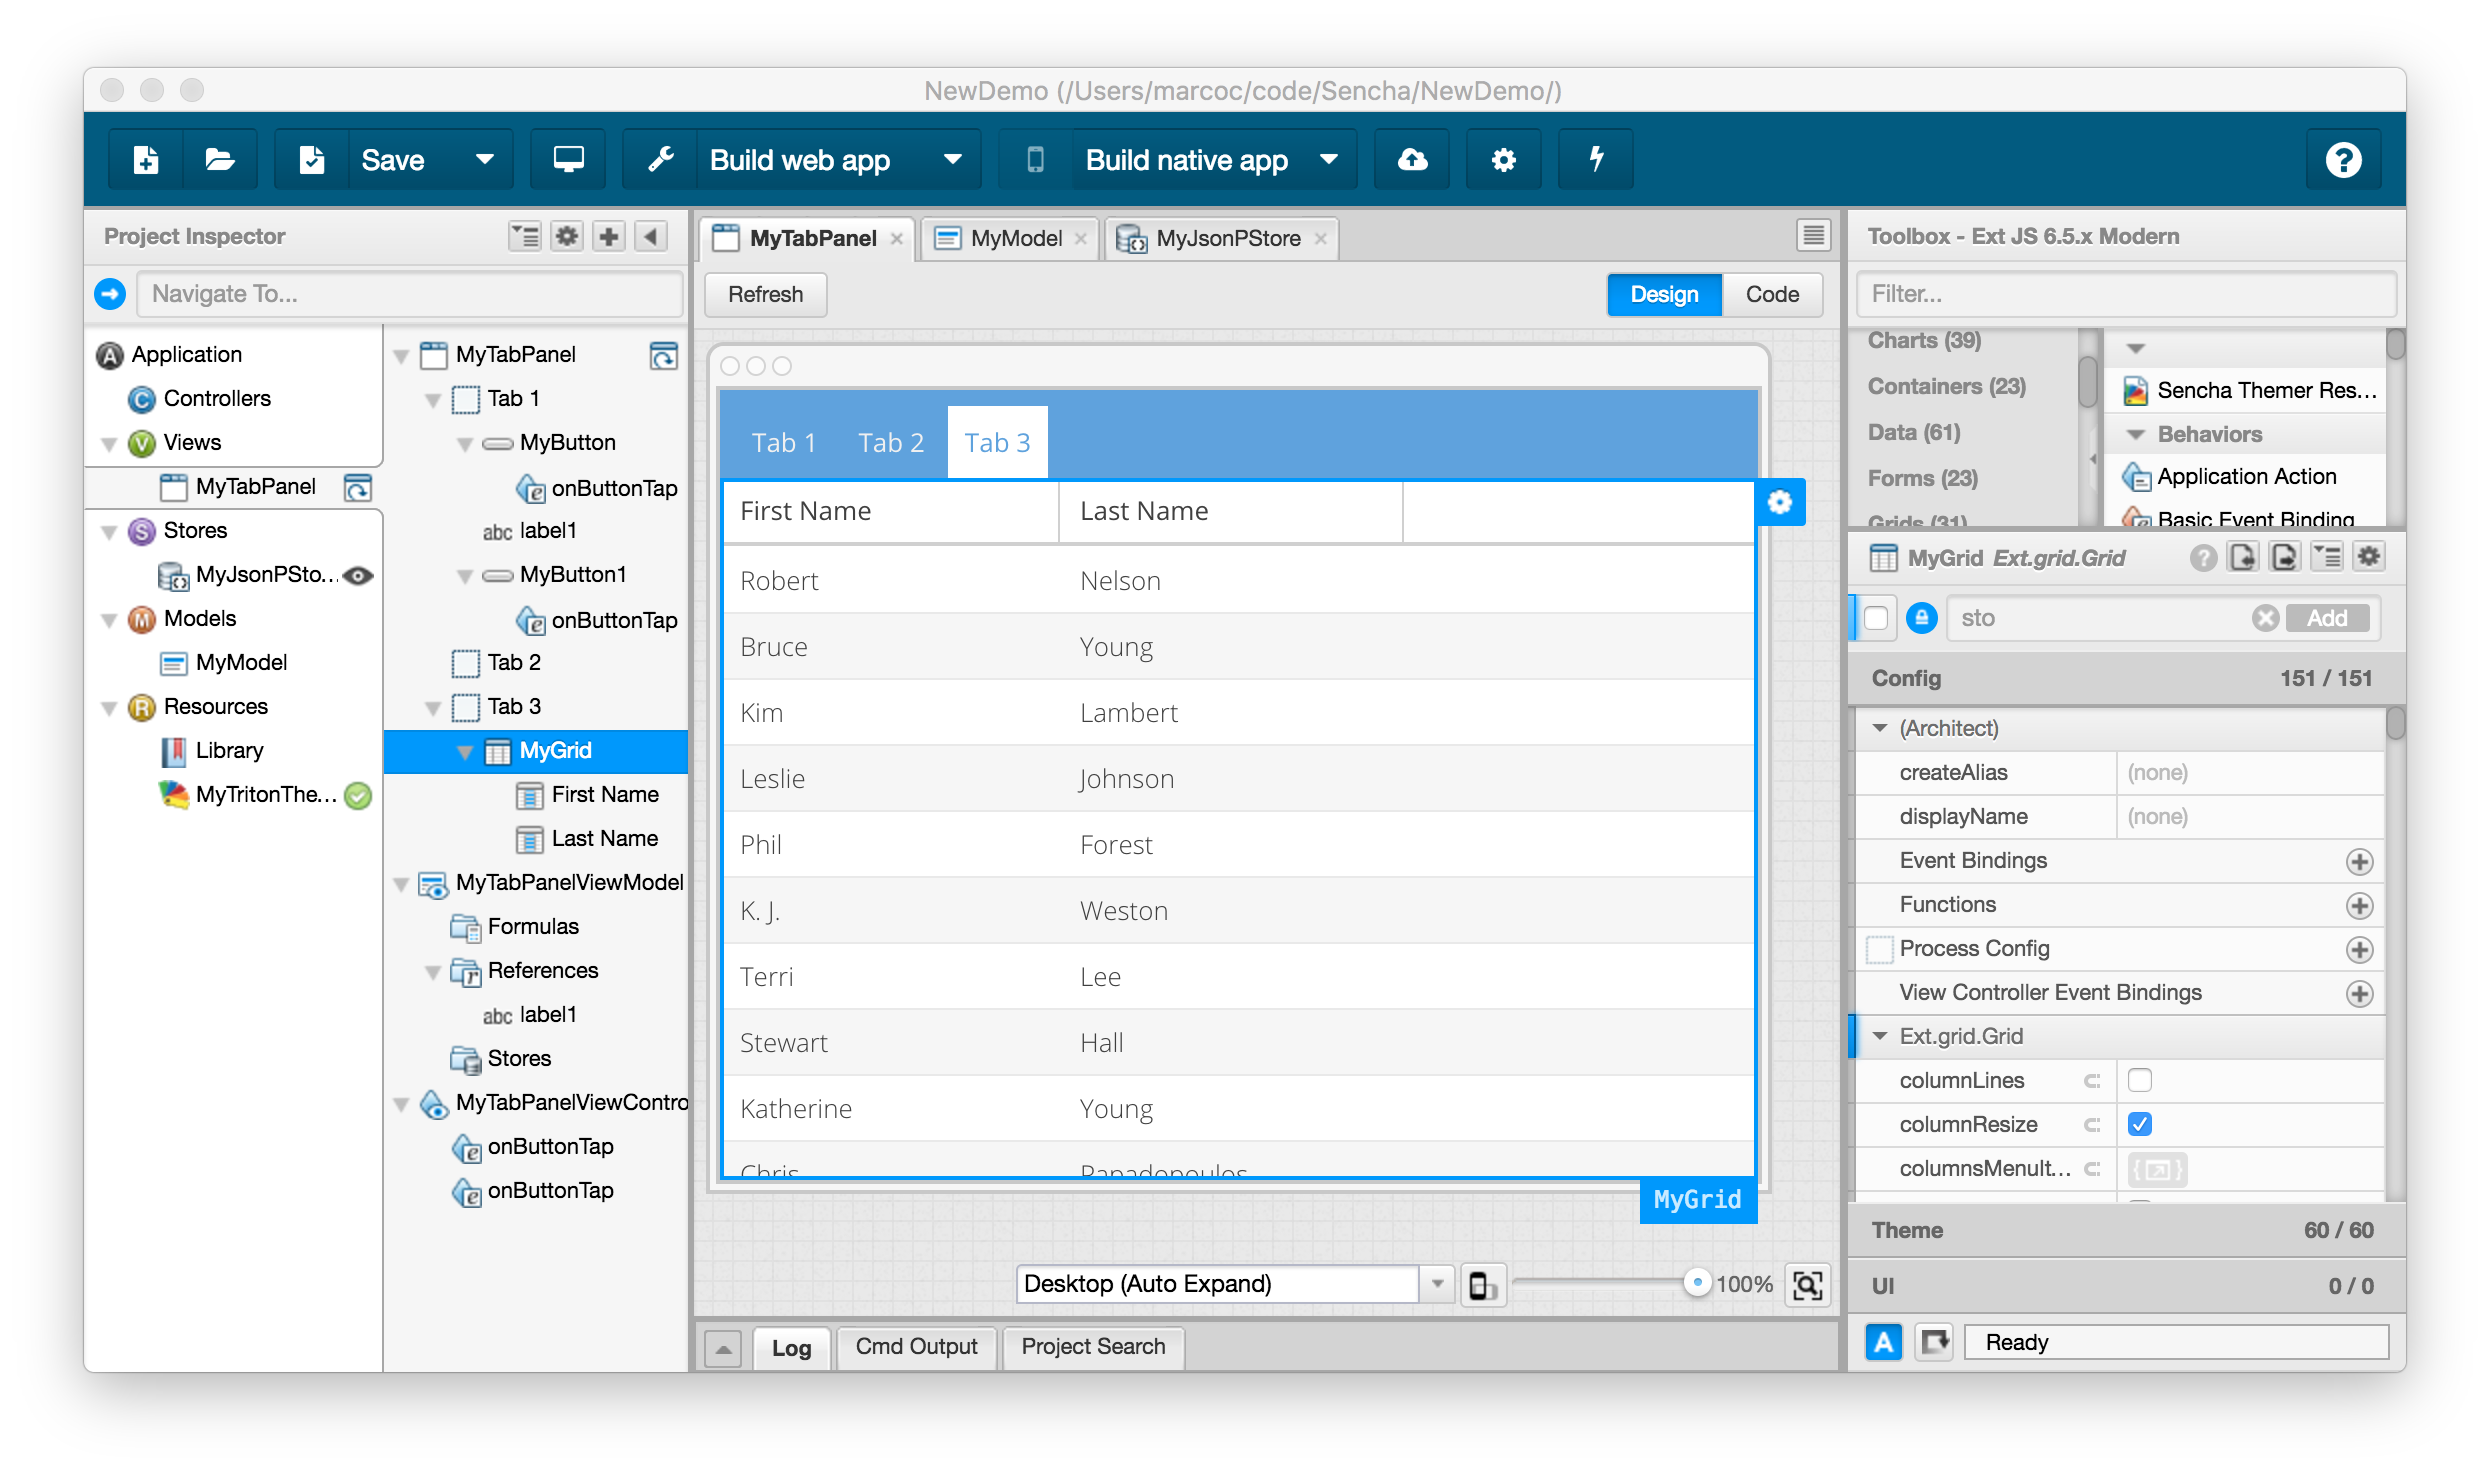
Now that we have a model and a data store (or actually two), we can wire up the user interface. For this simple case, I’ve just added a grid to the UI, added 5 columns to it, and tied each column to each field in the data model:
{ xtype: 'grid', height: '100%', width: '100%', store: 'MyJsonPStore', columns: [ { xtype: 'gridcolumn', width: 70, dataIndex: 'first_name', text: 'First Name' }, { xtype: 'gridcolumn', width: 80, dataIndex: 'last_name', text: 'Last Name' }, { xtype: 'gridcolumn', width: 80, dataIndex: 'phone_ext', text: 'Phone' }, ....With this configuration, you can preview your grid at design time in the Architect IDE, as shown here:
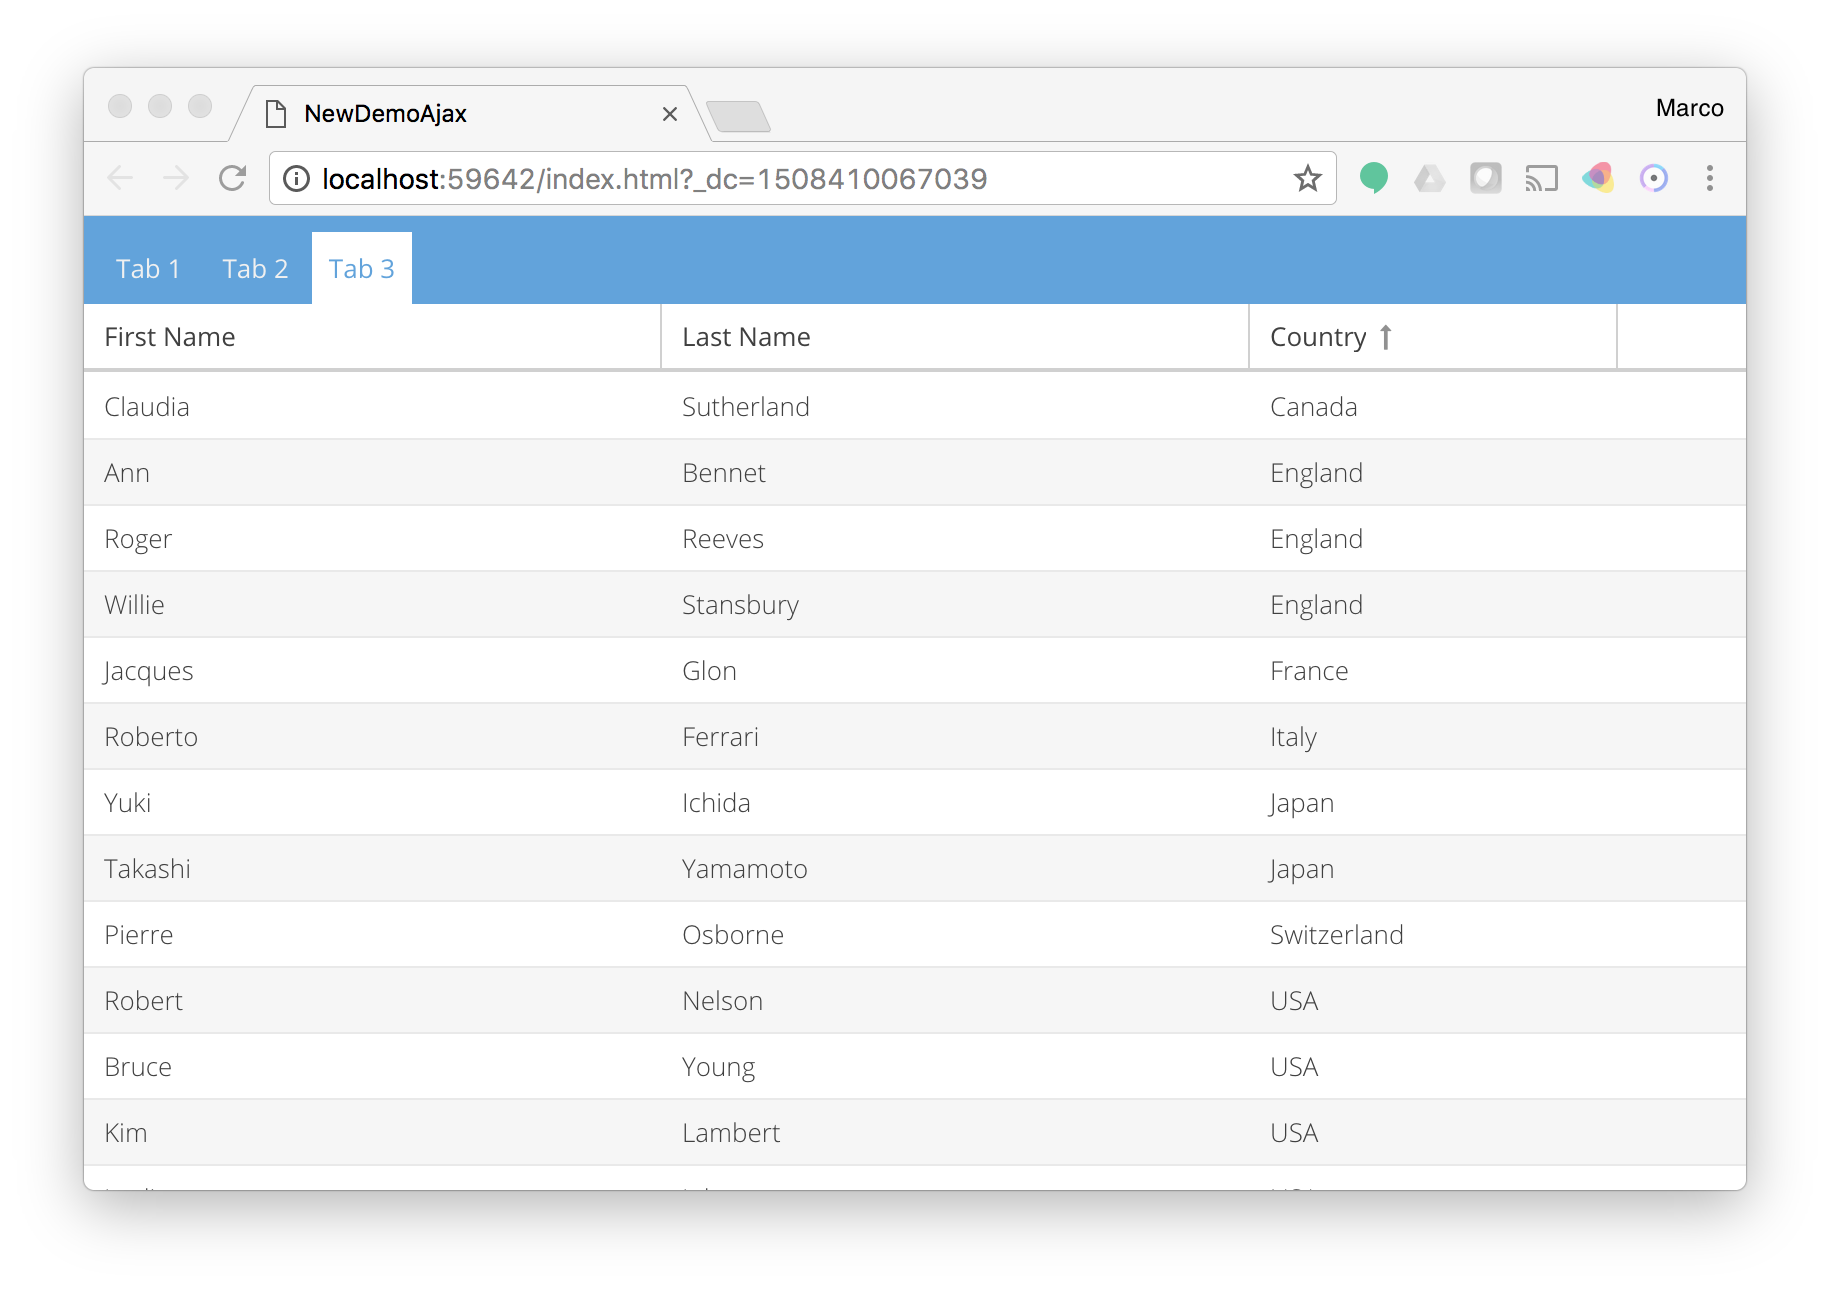
And finally, this is the final application running in a browser, with the ability to sort and rearrange the columns in a very sophisticated JavaScript grid in the browser, powered by the InterBase employee database and a RAD Server web service:
Summary
In summary the data flow is: InterBase database, FireDAC connection and SQL query, REST server method with custom JSON processing, ExtJS data storage, ExtJS grid for the UI. And something you can put together in 15 minutes!
While there are several different options on the table for using ExtJS and RAD Studio web services together, and more will be made available by Embarcadero in the future to further simplify the process, as you can see accessing to data produced by a Delphi application from an ExtJS client is reasonably simple.
Read More
↧
Save Paradox Blob format to a file using BDE

C++Builder 10.2 Tokyo does not have BDE installed.
So, Install BDE separately in C++Builder 10.2 Tokyo.
It is after the end of the all of the installation.
Download BDE Installer for RAD Studio, Delphi, C++Builder 10.2 Tokyo
Download the installer from the URL below.
ID: 30752, BDE Installer for RAD Studio, Delphi, C++Builder 10.2 Tokyo
Check the Paradox data.
Use the sample file named biolife.db.
This is sample data of Paradox.
I brought it from C++Builder 5 sample data.
There is a "Graphic" field in biolife.db. "Graphic" is Blob type.
Save the Blob data in the JPEG format using the BDE.
In VCL, JPEG can be processed using TJPEGImage.
Use TTable to get all of biolife.db.

Make the file name "Species No" + "Species Name" + ". Jpeg".
"Species No" + "Species Name" exists in DB field.
Confirm the output JPEG data

Read More
↧
What is my IP address?

There are many situation when it would handy to know the IP address of a device where our app is running. Maybe you want to identify who is running your app? By IP address it is also possible to calculate the approximate location of a device. If you connect to Internet through a router, there are big chances that it implements "Network Address Translation" (NAT), to make it harder for remote machines to establish a direct connection to a machine within a local network.
Recently I have come across a very simple and useful REST API that makes it possible to get the IP address and the geographical location of a client that invokes it. In this way we could find out under which IP address the Internet "sees" us.
If you send an HTTP GET request to http://ip-api.com/json, you will receive a JSON document with information about your IP address, longitude and latitude, country, city, zip code, ISP provider name, timezone and region.
In order to make this service easily accessible in code I have put together a little Delphi "TMyIP" class that provides one class function "GetInfo" that takes "TIPInfo" record "out" parameter and returns a boolean value that indicates if the parameter contains valid information. The actual HTTP GET request is made using the native "THTTPClient" class from "System.Net.HttpClient" unit. The JSON processing is done using "TJSONTextReader" class.
Below is the full source code of the "uMyIP" unit that contains the "TMyIP" class.
unit uMyIP;

interface

type
  TIPInfo = record
    status: string;
    aAs: string;
    city: string;
    country: string;
    countyCode: string;
    Isp: string;
    lat: double;
    lon: double;
    org: string;
    IPAddress: string;
    region: string;
    regionName: string;
    timezone: string;
    zip: string;
  end;

  TMyIP = class
  public
    class function GetInfo(out info: TIPInfo): boolean;
  end;

implementation

uses
  System.SysUtils,
  System.Classes,
  System.JSON.Readers,
  System.JSON.Types,
  System.Net.HttpClient;

const
  IP_API_JSON_URL = 'http://ip-api.com/json';

{ TMyIP }

class function TMyIP.GetInfo(out info: TIPInfo): boolean;
var c: THTTPClient; json: string; sr: TStringReader; jtr: TJsonTextReader;
  resp: IHTTPResponse;
begin
  Result := False;
  c := THTTPClient.Create;
  try
    try
      resp := c.Get(IP_API_JSON_URL);
      json := resp.ContentAsString;
    except
      exit;
    end;
  finally
    c.Free;
  end;

  sr := TStringReader.Create(json);
  try
    jtr := TJsonTextReader.Create(sr);
    try
      while jtr.Read do
      begin
        if jtr.TokenType = TJsonToken.PropertyName then
        begin
          if jtr.Value.ToString = 'status' then
          begin
            jtr.Read;
            info.status := jtr.Value.AsString;
          end

          else if jtr.Value.ToString = 'as' then
          begin
            jtr.Read;
            info.aAs := jtr.Value.AsString;
          end

          else if jtr.Value.ToString = 'city' then
          begin
            jtr.Read;
            info.city := jtr.Value.AsString;
          end

          else if jtr.Value.ToString = 'country' then
          begin
            jtr.Read;
            info.country := jtr.Value.AsString;
          end

          else if jtr.Value.ToString = 'countyCode' then
          begin
            jtr.Read;
            info.countyCode := jtr.Value.AsString;
          end

          else if jtr.Value.ToString = 'isp' then
          begin
            jtr.Read;
            info.isp := jtr.Value.AsString;
          end

          else if jtr.Value.ToString = 'lat' then
          begin
            jtr.Read;
            info.lat := jtr.Value.AsExtended;
          end

          else if jtr.Value.ToString = 'lon' then
          begin
            jtr.Read;
            info.lon := jtr.Value.AsExtended;
          end

          else if jtr.Value.ToString = 'org' then
          begin
            jtr.Read;
            info.org := jtr.Value.AsString;
          end

          else if jtr.Value.ToString = 'query' then
          begin
            jtr.Read;
            info.IPAddress := jtr.Value.AsString;
          end

          else if jtr.Value.ToString = 'region' then
          begin
            jtr.Read;
            info.region := jtr.Value.AsString;
          end

          else if jtr.Value.ToString = 'regionName' then
          begin
            jtr.Read;
            info.regionName := jtr.Value.AsString;
          end

          else if jtr.Value.ToString = 'timezone' then
          begin
            jtr.Read;
            info.timezone := jtr.Value.AsString;
          end

          else if jtr.Value.ToString = 'zip' then
          begin
            jtr.Read;
            info.zip := jtr.Value.AsString;
          end

        end;
      end
    finally
      jtr.Free;
    end;
  finally
    sr.Free;
  end;

  Result := info.status = 'success';
end;

end.
Let's quickly test this class. Start Delphi and create a new "Multi-Device Application" project. Choose "Blank Application" template and save the main form as "uFormMyIP" and the whole project as "MyIP". You can optionally change the "Name" property of the form to "FormMyIP". Add a new unit to the project and save it as "uMyIP". Copy the above code, select the source code of the empty unit and paste the code to replace the entire content. Now add the new "uMyIP" unit to the uses clause of the form. Drop a button on the form and align it to "Top". Change its "Text" property to "Check IP". Drop "TListView" control onto the form, align it to "Client" and change its "Name" property to "lstvwInfo". Double-click on the button and add the following code to the "OnClick" event handler to invoke the "TMyIP.GetInfo" and display the data in the list view.
uses uMyIP;

procedure TFormMyIP.btnCheckIPClick(Sender: TObject);

  procedure AddItem(txt, det: string);
  var item: TListViewItem;
  begin
    item := lstvwInfo.Items.Add;
    item.Text := txt;
    item.Detail := det;
  end;

var info: TIPInfo; item: TListViewItem;
begin
  if TMyIP.GetInfo(info) then
  begin
    lstvwInfo.BeginUpdate;
    try
      lstvwInfo.Items.Clear;
      AddItem(info.IPAddress, 'IP address');
      AddItem(info.city, 'City');
      AddItem(info.country, 'Country');
      AddItem(info.timezone, 'Timezone');
      AddItem(info.lat.ToString, 'Latitude');
      AddItem(info.lon.ToString, 'Longitude');
    finally
      lstvwInfo.EndUpdate;
    end;
  end
  else
    ShowMessage('Failed');
end;
Save all and run the project. When you click on the button you should see how the world sees You!
The complete source code of this simple demo can be downloaded from here. Enjoy!
Read More
↧
CodeRage开始征召演讲内容
一年一度的CodeRage活动又将开始, 英巴也开始召唤有意在此舞台展示的使用者报名参加. 今年将有重量级的技术人才 Robert C. Martin参加, 他的Clean Code: A Handbook of Agile Software Craftsmanship一书相信是许多人都读过的好书.
大陆有兴趣的朋友也可以赶快报名参加主讲, 当然您必须整场以英文演说, 因此对除了技术之外, 对于英文语言能力也是一大挑战.
欲报名参加的详细可参考以下的连结:
https://community.embarcadero.com/blogs/entry/coderage-xii
Read More
↧
↧
CodeRage開始徵召演講內容
一年一度的CodeRage活動又將開始, 英巴也開始召喚有意在此舞台展示的使用者報名參加. 今年將有重量級的技術人才 Robert C. Martin參加, 他的Clean Code: A Handbook of Agile Software Craftsmanship一書相信是許多人都讀過的好書.
台灣有興趣的朋友也可以趕快報名參加主講, 當然您必須整場以英文演說, 因此對除了技術之外, 對於英文語言能力也是一大挑戰.
欲報名參加的詳細可參考以下的連結:
https://community.embarcadero.com/blogs/entry/coderage-xii
Read More
↧
Cool App Winner for September: RAD & Installer

I’m excited to announce that our September Cool App contest winner for September is RAD & Installer. While I continue to be impressed at how all our Cool App winners are providing interesting, useful, entertaining and generally “cool” capabilities, I admittedly have a soft spot for apps like RAD & Installer that improve the usability of one of our very own Embarcadero tools, in this case RAD Studio.
Creating an installer is an important step in delivering software. RAD & Installer integrates two of the most popular and most powerful installers right into the IDE: NSIS and Inno Setup. This simplifies the process with a powerful integration while showing the power of the RAD Studio IDE through extensions.
RAD & Installer developer Tomas Slapka of UnSigned used Delphi to create the app because, in his words, “the tool is the choice for developers wanting the power, readability and flexibility of the Modern Object Pascal language, coupled with native compilers and component libraries for fast single source code development on Windows, macOS, iOS, Android and Linux.”
With RAD & Installer, developers can now create an installer in a matter of minutes. They simply add NSIS or Inno Setup project and build setup for their application, library, component or any project they develop. Developers can work in single powerful IDE, use all their favorite features and deliver their software fast and easily.
This video provides a quick introduction to RAD & Installer.
[YoutubeButton url='https://youtu.be/J4BSK_ASOlw']
Interested in submitting for the Embarcadero’s Cool App contest? It’s open to any business or consumer application built with RAD Studio, Delphi or C++Builder. Embarcadero awards Cool App contest winners a $500 Amazon gift card and winning submissions are also highlighted on the company’s YouTube channel. For more information on the contest and a link to the submission form, click here.
Read More
↧
Display JSON Base64 images created in C++Builder using Ext JS in browser

Output to JSON Base64 Image Data Reading Browser.
I use Ext JS. And the JSON server is C++Builder bcc32.

Create a standalone new project for WebBroker.

Add action on TWebModule side.
PathInfo is set to "/img".

It is a code to output JSON corresponding to CORS.
Code that can be compiled with bcc32. For CORS please refer to the following URL.
https://developer.mozilla.org/en-US/docs/Web/HTTP/CORS
The output JSON is as follows.
Ext JS design.
Create image and button screens using Sencha Architect.

Add Store.
Create a button event for Ext JS.
Read More
↧
Test Unitarios; Introducción (Entrega 1)

¿Qué es un test unitario?
 El objetivo más a corto plazo de un test unitario (o prueba unitaria) es el de probar una porción de nuestro código, de forma que podamos comprobar que funciona correctamente y que se ejecuta con el comportamiento para el que fue diseñado. Por lo tanto nos ayuda a encontrar fallos en nuestro código.
Podríamos decir que un objetivo más amplio de los test unitarios es, en general, mejorar la calidad del software que desarrollamos. Por un mejor diseño y por un menor número de errores.
Hay quien dice que los test unitarios están pensados para equipos de trabajo donde hay roles definidos. Personalmente considero que hoy en día los test unitarios para un programador, son como el "control de versiones" o los "repositorios de código". Para mi NO SON EXCLUSIVOS de equipos de trabajo, sino que un programador a nivel personal (individual) DEBE trabajar con ellos, aunque no esté integrado en un equipo.
TDD (Test Driven Development)
Los test unitarios se enmarcan dentro de lo que se conoce como TDD (desarrollo guiado por pruebas) que nos ayuda a no crear test y probar código "a lo loco".
La idea sería seguir los siguientes pasos:

- PASO 1: Definimos/diseñamos una prueba para validar un código que cumple determinados requisitos.
- PASO 2: Desarrollamos el código para ejecutar la tarea que se ha especificado.
- PASO 3: Ejecutamos la prueba. Si falla corregimos el código y repetimos, si funciona correctamente, refactorizamos y limpiamos el código (si es necesario) y damos este "step" por concluido, pasando al siguiente.
Ventajas de realizar Test unitarios
Tal vez podamos empezar por las más básicas, pero también más sencillas.
- Un test nos sirve como "documentación de código".
Dado que un test nos muestra los posibles resultados que una determinada función nos debe dar a partir de unas entradas, a su vez nos sirve como explicación y documentación del funcionamiento de esa procedimiento. - Nos obliga a separar Interfaz e Implementación.
Es algo imprescindible en una programación avanzada y los test nos obligan en cierta forma a separar ambas. Dado que los test se ejecutan sin interacción del usuario, necesitamos que la interfaz esté obligatoriamente excluida de las funciones que probamos en los test. Indirectamente esto hace que el código sea más mantenible.
Además indirectamente facilita que el código esté focalizado en una tarea. En un desarrollo a veces se tiende a tener código "que mezcla" diferentes funcionalidades, interfaz, acceso a datos, utilidades,...
Al realizar las pruebas tenemos más fácil separar las funcionalidades que necesitamos testear. - Facilita cambios de código.
Los test nos dan más seguridad sobre que los cambios realizados no introducen nuevos errores en el código existente, por lo tanto nos aporta más confianza a la hora de realizarlos. Los test nos añaden como una "red de seguridad" a la hora de desarrollar. - Mejora la detección de errores.
Por supuesto es una de las razones más importantes por las que realizamos los test. La existencia de los test nos facilita la detección de errores si se producen, tanto al crear como al actualizar nuestros desarrollos. - Aceleran el desarrollo.
Aunque a priori pueda parecer que tenemos que escribir más código para realizar la misma tarea y por lo tanto vamos a tardar más en realizarla, ese tiempo que invertimos inicialmente a la larga se demuestra que se recupera pues se minimizan las pruebas, la revisión de código, la búsqueda de errores,...
¿Cómo debe ser un buen test unitario?
Las características que pueden definir de forma esquemática un buen test unitario, serían las siguientes:
 Se deben poder ejecutar de forma automatizada.
- Podemos ejecutarlos tantas veces como sea necesario.
- Debe testear lo correcto.
- Deben ser sencillos y rápidos.
- Deben evitar dependencias. Se deben poder ejecutar todos o parte de ellos y sin orden determinado.
- Deben ser desarrollados antes de programar.
- A todos los efectos son código de la aplicación, no algo externo.

"LA CLASE" (TAritmeticaBasica)
Para poder realizar pruebas sobre un determinado código, lo primero que vamos a necesitar es un código que testear. Para esto vamos a crear la clase "TAritmeticaBasica". Es decir, nuestro escenario es el siguiente:
"Debemos crear una clase que llamaremos TAritmeticaBasica, que como su nombre indica, necesitamos que realice determinadas operaciones aritméticas y hemos decidido que esta clase incluirá Tests Unitarios."
Los pasos que vamos a seguir son los siguientes:
- Definir la estructura de nuestra clase. Qué va a tener, qué necesitamos probar,...
- Definir una batería de Tests Unitarios que nos permitan probar las características definidas en el punto 1.
- Implementar la Clase TAritmeticaBasica.
- Ejecutar los test y a partir de los resultados de cada test:
- (Correcto) Refactorizar código si es necesario.
- (Error) Corregir la clase y volver a ejecutar el punto 4.
ESTRUCTURA DE LA CLASE
Nuestra clase TAritmeticaBasica tendrá la siguiente estructura y propiedades
  // Clase para cálculos aritméticos
  TAritmeticaBasica = class
  public
    // Devuelve si el número es primo o no
    function EsNumeroPrimo(const ANumero:int64):boolean;
    // Devuielve el máximo común Divisor de 2 números enteros
    function MaximoComunDivisor(const ANumero1, ANumero2:int64):int64;
    // Devuelve el Minimo comun Multiplo de 2 números enteros
    function MinimoComunMultiplo(const ANumero1, ANumero2:int64):int64;
    // Calcula la factorizacion de un número entero; Resultado en una lista
    procedure Factorizacion(ANumero: int64; ALista:TIntegerList);
  end;
end;
Si seguimos de forma estricta los pasos que hemos realizado antes, debemos implementar los tests antes de implementar la clase. Lo que haremos será crear nuestra unit "vacía" y a partir de ahí generaremos los test. Para ello a la definición que ya tenemos, le añadiremos lo siguiente en la parte de implementación:
unit UClass.TAritmeticaBasica;

interface

uses
  System.Generics.Collections;

type
  // Type form integerlist
  TIntegerList = TList;

  // Clase para cálculos aritméticos
  ...

Implemementation

function TAritmeticaBasica.EsNumeroPrimo(const ANumero: int64): boolean;
begin
  Result := True;
end;

procedure TAritmeticaBasica.Factorizacion(ANumero: int64; ALista:TIntegerList);
begin
  ALista.Clear;
end;

function TAritmeticaBasica.MaximoComunDivisor(const ANumero1, ANumero2: int64): int64;
begin
  Result := 0;
end;

function TAritmeticaBasica.MinimoComunMultiplo(const ANumero1, ANumero2: int64): int64;
begin
  Result := 0;
end;
end.
Aquí tenéis la unit al completo para descargar tal y como la tenemos ahora (sólo estructura).
<Descargar código fuente de UClass.TAritmeticaBasica.pas>
Os adjunto a continuación algunos links y algo de información que pueden servir de recordatorio sobre las 4 operaciones que posee nuestra clase (me recuerdan a mis clases de matemáticas en el colegio ;-D ).
|
Números primos https://es.wikipedia.org/wiki/N%C3%BAmero_primo Número primo es aquel que sólo es divisible por 1 y por si mismo. Máximo común divisor http://www.elabueloeduca.com/aprender/matematicas/divisibilidad/maximocomundivisor.html El MCD de dos números enteros positivos es el mayor divisor común (que comparten ambos). Ejemplos: Los divisores comunes de 6, 12 y 18 son ? 1, 2, 3, 6 Como el mayor es 6, el M.C.D. (6 , 12 , 18) = 6 Utilizar factorización para calcular el M.C.D. de varios números. Factorización de 24 = 2 x 2 x 2 x 3 M.C.D (24 , 88) = 8 Factorización de 15 = 3 x 5 M.C.D (15 , 24) = 3 Mínimo común múltiplo http://www.elabueloeduca.com/aprender/matematicas/divisibilidad/minimocomunmultiplo.html https://es.wikipedia.org/wiki/M%C3%ADnimo_com%C3%BAn_m%C3%BAltiplo El M.C.M. de dos o más números enteros, es el menor múltiplo común que comparten entre ellos, distinto de cero. Ejemplos: M.C.M. (6 , 12 , 18) = 36 Los múltiplos de 6 son ? 6, 12, 18, 24, 30, 36, ... Los múltiplos de 12 son ? 12, 24, 36, 48, 60, ... Los múltiplos de 18 son ? 18, 36, 54, 72, 90, ... (el mínimo múltiplo que comparten los tres es el 36). Otros ejemplos: M.C.M. (36, 84, 120) = 2.520 M.C.M. (14 , 21) = 42 M.C.M. (5 , 3) = 15 M.C.M. (18 , 26) = 234 M.C.M. (700 , 24) = 4200 Factorización en números primos http://www.elabueloeduca.com/aprender/matematicas/divisibilidad/factorizacion.html Se trata de descomponer un número como producto de factores primos. Ejemplos: (Debe ser un número mayor o igual a 2) 2310 = 2 x 3 x 5 x 7 x 11 3150 = 2 x 3 x 3 x 5 x 5 x 7 543 = 3 x 181 2 = Primo 7 = primo 1111 = 11 x 101 850 = 2 x 5 x 5 x 17 |
Hasta aquí esta primera entrada de la serie. He decidido dividirla en varios bloques por la extensión de la misma.
La idea para las siguientes, es diseñar las pruebas unitarias para nuestra unit utilizando los paquetes DUnit y DUnitX. Ver los pasos para crearlos desde cero y ver las diferencias (no muchas) que hay entre ellos.
Un saludo y hasta la próxima.
Read More
↧
↧
FMX.Graphicsの TBitmapマスクを利用する場合[JAPAN]


Delphiの場合
Delphiでは TBitmapの constructorは別名で複数持っています。
CreateFromBitmapAndMask, CreateFromFile, CreateFromStream

C++Builderの場合
C++BuilderではCreateFromBitmapAndMaskは無く同名のconstructorで処理できます。

下記述したC++コードはbcc32です。
出力結果

Read More
↧
Sencha RAD Mix Tokyo 開催のお知らせ [JAPAN]

2017年冬は、技術イベント「Sencha RAD Mix Tokyo」を開催
エンバカデロ・テクノロジーズではデベロッパーキャンプを年2回、夏と冬に開催しておりますが、今年2017年の冬は Sencha の開発者向けの技術イベント Sencha Roadshow とのミックスとして、Sencha RAD Mix Tokyo を開催いたします。
イベントに関する一次情報は http://forms.embarcadero.com/sencha-rad-mix をご覧いただくとして、この記事ではサマリや補足についてご案内いたします。
Read More
↧
Delphi Blogs of the Month #56
While clearly difficult to have a weekly summary, Iv'e fully retitled this installment, although the URL stays as part of the original weekly sequence. Let's get started.
Embarcadero News
A Busy Summer at https://community.embarcadero.com/article/16572-a-busy-summer
Embarcadero Academy Debuts with Online Courses for Developers of All Levels press release at http://www.businesswire.com/news/home/20170918005798/en/Embarcadero-Academy-Debuts-Online-Courses-Developers-Levels
New in 10.2.1: Debug visualisers for Delphi generics at https://community.embarcadero.com/blogs/entry/new-in-10-2-1-debug-visualisers-for-delphi-generics
Build iOS 11 ready apps with RAD Studio 10.2.1 at https://community.embarcadero.com/blogs/entry/build-ios-11-ready-apps-with-rad-studio-10-2-1
Updating IDE Subversion DLLs to address security issues at https://community.embarcadero.com/blogs/entry/updating-ide-subversion-dlls-to-address-security-issues
Blog Posts
Working with big data databases in Delphi - Cassandra, Couchbase and MongoDB (Part 3 of 3) at https://blog.grijjy.com/2017/09/21/working-with-big-data-databases-in-delphi-cassandra-couchbase-and-mongodb-part-3-of-3/
Debugging RTL/VCL Code with CodeSite at http://www.davidghoyle.co.uk/WordPress/?p=1754 and the follow up ,Notify Me of Everything - Part 2, at http://www.davidghoyle.co.uk/WordPress/?p=1761
5 Minute Snack: Reading floats with StrToFloat and TFormatSettings independent of system region settings at https://flixengineering.com/archives/612
Easily Make Asynchronous REST Calls In Delphi 10.2.1 Tokyo On Android, iOS, macOS, and Windows 10 at https://community.embarcadero.com/blogs/entry/easily-make-asynchronous-rest-calls-in-delphi-10-2-1-tokyo-on-android-ios-macos-and-windows-10
Face Detection on Android and iOS at https://blog.grijjy.com/2017/09/11/face-detection-on-android-and-ios/
Experimenting with Neural Networks - Part 1 (and following in subsequent posts) - http://chapmanworld.com/2017/09/20/experimenting-with-neural-networks-part-1/
Adding a Custom Icon to a FireMonkey Button at https://community.embarcadero.com/blogs/entry/adding-a-custom-icon-to-a-firemonkey-button
RAD Studio 10.2: Windows 10 VCL UWP/WinRT Support at https://community.embarcadero.com/blogs/entry/rad-studio-10-2-windows-10-vcl-uwp-winrt-support
Amazon DynamoDB with Delphi (video) at https://community.embarcadero.com/blogs/entry/amazon-dynamodb-with-delphi
5 Minute Snack: Is a package installed? The Package Manager icons tell you! https://flixengineering.com/archives/618
Third Party Libraries
TLanguage localization tool: https://delphitipsandtrick.blogspot.it/2017/10/delphi-tlanguage-localizaton-tool.html
Not new but fairly interesting.... Python for Delphi at https://github.com/pyscripter/python4delphi and you can read about it at http://www.atug.com/andypatterns/pythonDelphiTalk.htm
Delphi RNL ("Realtime Network Library") at https://github.com/BeRo1985/rnl
Use this RFID library in Delphi at https://github.com/islog/liblogicalaccess/wiki/Use-this-RFID-library-in-Delphi
Built with Delphi
Roselt Color Picker in Windows Store: https://www.microsoft.com/en-za/store/p/roselt-color-picker/9nq8c70flp0r?rtc=1
Smart IDE for OpenSCAD at https://github.com/senCille/senCilleSCAD/wiki
That's all for this month.
Read More
↧


