Quantcast
Channel: Latest blog entries - Embarcadero Community
Viewing all 1683 articles
Browse latest View live

Brutally Roll Your Own Backend – Part 4


3 days event in Osaka [JAPAN]

$
0
0

大阪では6/23(木)〜6/25(土)の3日間連続で様々なセミナーや勉強会があり、弊社日本法人からも登壇いたしました。いずれも多くの方にご来場いただきました。ここではその内容を簡単にご紹介いたします。


6/23(木)

ミガロ.様主催「18回 Delphi/400テクニカルセミナー」
基調講演「IoTでどう変わる?これからの業務システムとは」

ミガロ.様のセミナーではIoTを業務システムに取り入れることで起きる効果をご説明しつつ、IoTから取得した測定値をリアルタイムに処理する簡単な実例をご紹介しました。

今までは数値化して管理することが難しい情報や、人手での計測では点在的にしか取得できなかった情報が、IoTによって連続的かつ自動的に取得できるようになりつつあります。その情報を適切に管理しつつ分析することで全体の傾向把握、将来の予測を行うためのヒントとなります。


6/24(金)

ビーコンによる位置検出活用勉強会(丸紅情報システムズ様 共催)

この勉強会では、ビーコンの基本と応用の説明、事例紹介、実際のソフトウェア実装のデモという3つの内容をご説明しました。デベロッパーキャンプでもビーコンのデモは行っていますが、1時間枠での説明ではどうして要点をかいつまんだ説明となってしまいます。しかし勉強会は時間枠が2時間ということで、他のセミナーに比べて内容が濃くなっております。


6/25(土)

第11回 RAD Studio勉強会@Osaka

IoTデバイスとつなごう!実践、RAD Studio 10.1 Berlin IoTプログラミング


大阪はユーザ会の活動が活発で、勉強会も定期的に開催されています。


今回はデベロッパーキャンプやその他のセミナー同様に、会場にビーコンを設置して会場のナビアプリを披露するように準備しましたが、デベロッパーキャンプにご来場いただいた方も多かったことから心拍計を用いたデモは目新しさが足りないと思われましたので、環境センサー TI SensorTag を用いた温度や明るさの取得のデモを行いました。


また参加者の中に 10 Seattle や 10.1 Berlin をインストール済みのPCをお持ちの方がいらっしゃいましたので、BeaconFence を用いた位置即位アプリケーションを実際に作ってみるという進め方も併せて行いました。


日本でのセミナーやワークショップに関する情報は以下のURLでご覧いただけます。開催済みのイベントの中には動画や資料を公開しているものがございます。また今後の開催予定についても随時更新していきます。

http://forms.embarcadero.com/events-japan


Read More

Integrando Mini Impressora bluetooh com aplicativos Delphi Mult-Device Android

$
0
0

Integrando Mini Impressora bluetooh portátil com aplicativos Delphi Mult-Device Android

Neste artigo mostraremos como utilizar uma mini impressora térmica bluetooh portátil em um aplicativo Android desenvolvido em Delphi. Em outras palavras, faremos a integração do SDK da impressora com nosso código fonte em Delphi.

Inicialmente devemos ter em mente que cada impressora possui uma forma própria de implementação, algumas mais parecidas entre si que outras, mas divergindo de fabricante para fabricante. E como cada um possui um SDK especifico para sua impressora, os métodos e os parâmetros para instância dos objetos variam entre os diversos fabricantes.

Quem já desenvolveu algum sistema de PDV sabe bem como é ter que lidar com vários fabricantes de impressoras fiscais, as impressoras bluetooth seguem a mesma logica.

Neste artigo faremos a integração com um modelo “Chig-Ling”, a impressora da Ocom modelo OCPP-M03, (http://www.ocominc.com/pt/products/OCPP-M03.htm) que custa em torno de U$ 150,00 com o envio pelo Aliexpress, sem impostos!

A primeira coisa que precisamos fazer é obter o SDK da impressora para o Android.

Enquanto que para o Windows os fabricantes nos disponibilizam arquivos .dll para integração de seus dispositivos, no Android os fabricantes nos disponibilizam arquivos .jar.


Jar - (Java ARchive) é um arquivo compactado usado para distribuir um conjunto de classes Java, um aplicativo java, ou outros itens como imagens, XMLs, entre outros. É usado para armazenar classes compiladas e metadados associados que podem constituir um programa.

Fonte: https://pt.wikipedia.org/wiki/JAR_(formato_de_arquivo)


Sim, é Java!

E se você souber pelo menos ler código Java, ajudará bastante a entender o funcionamento do SDK da impressora. Uma vez que os exemplo de integração com Android serão sempre disponibilizados em Java.


Arquivo Bridge

Uma vez com o SDK em mãos, no caso do modelo OCPP-M03 o fabricante nos disponibilizou o arquivo btsdk.jar, vamos precisar consumir este arquivo em nosso projeto Firemonkey no Delphi.

Para utilizarmos um arquivo jar precisamos gerar uma Unit que faça o meio de campo entre nosso código fonte e o arquivo java, essa unit é chamada de "Delphi native bridge file", ou simplesmente um arquivo de Ponte ou Bridge.


Desde a versão XE7 a Embarcadero disponibiliza uma ferramenta para ajudar nós desenvolvedores Delphi na criação de interfaces com as classes Java Android.


O Java2Op tem a finalidade de traduzir as APIs Java para Object Pascal, ou seja criar nosso arquivo Brigde.


O download do Java2Op está disponível para usuários registrados no seguinte link:


Mas antes de utilizarmos o Java2Op é preciso alguns pré requisitos.


Java JDK


Para executar o Java2Op é necessário a instalação da JDK do Java. Mas atenha-se a versão, o Java2Op utiliza a versão 7 da JDK e não a 8, atual versão distribuída pela Oracle.

Você pode baixar a versão 7 do JDK  do Java no seguinte link:

http://www.oracle.com/technetwork/java/javase/downloads/java-archive-downloads-javase7-521261.html


Requisito para baixar versões antigas, para efetuar o download da JDK 7 é preciso se cadastrar-se no site da Oracle.

Após a instalação da JDK é preciso configurar o Path do Windows (Painel de ControleSistema e SegurançaSistemaConfigurações avançadas do sistemaVariáveis de Ambiente) adicionando a pasta bin do diretório de instalação (Ex. C:Program Files (x86)Javajdk1.7.0_72bin)


Java2Op


O Java2Op é disponibilizado pela Embarcadero para usuários registrados:

http://cc.embarcadero.com/Download.aspx?id=30007


Ao baixarmos o Java2Op, um arquivo zip e descarregado, neste arquivo vamos precisar apenas do java2op.zip. Descompacte-o em um diretório seu.


Para fazer a geração do Bridge copie o arquivo jar para uma pasta src no diretório do Java2op. Como ele é uma ferramenta de linha de comando, então faremos sua execução via prompt de comando. CMD neles!


O seguinte comando efetua a geração do Bridge:


Java2op.exe -jar -unit


Como no meu caso o arquivo .jar se chama btsdk.jar, está na pasta src no diretório do Java2Op e vou chamar o meu arquivo Bridge de Android.JNI.btsdk.pas, seguindo a convenção de nomenclatura de Units Android no Delphi, o comando fica da seguinte forma:


Java2op.exe -jar srcbtsdk.jar -unit Android.JNI.btsdk.pas


Caso ao executá-lo lhe aparecer o este erro: "Generic Type not defined"

Você provavelmente está utilizando a versão 8 da JDK e não a 7. Verifique a instalação e se o seu Path do Windows estão apontando para versão correta.


Tudo ocorrendo bem o arquivo Android.JNI.btsdk.pas foi criado na pasta do Java2Op.

Tanto o btsdk.jar quanto o Android.JNI.btsdk.pas serão utilizados em nosso projeto.


Desenvolvendo o aplicativo


Vamos ao nosso projeto!


Criaremos então nosso projeto Firemonkey (FileNewMult-Device ApplicationBank Application) e nele colocaremos quatro botoes, um edit e um memo.


Layout.png


E adicionaremos nossos dois arquivos ao projeto.


O Arquivo  Android.JNI.btsdk.pas é adicionado normalmente como qualquer outro fonte, ou seja com botão direito do mouse sobre o nome do projeto no Project Manager, clicamos na opção Add..., e selecionamos o nosso .pas.
O arquivo btsdk.jar será adicionado às bibliotecas do Android no Projeto.

No Project Manager, na pasta Target Paltaform/Android/Libraries, com o botão direito clicamos na opção Add... e selecione o arquivo .jar

ProjectManagerImpBT.png


Com estes passos as bibliotecas necessárias para a integração da impressora foram efetuados. Iremos para a parte da codificação.

Integrando o SDK


Na maior parte dos casos os fabricante disponibilizam um código de exemplo sobre como fazer a integração com seus dispositivos. Estes exemplos, assim como a biblioteca estarão desenvolvidos em Java. Como disse antes, saber pelo menos ler códigos fontes em Java será muito útil.

A biblioteca que importamos expõem uma interface chamada JBluetoothService, ela quem faz toda a “mágica” para nós, dela iremos utilizar 4 funcionalidade em nosso projeto, que será:
 1 - Listar os dispositivos pareados;
 2 - Conexão com a Impressora;
 3 - Status da Impressora;
 4 - Envio de texto para impressão.
 
Dessa forma começamos declarando uma variável Global Privada do tipo JBluetoothService, iremos chama-la de FService.

TForm1 = class(TForm)

[...]

private

 FService: JBluetoothService;


A instância de nosso objeto principal se dará no clique do botão que listará os Devices pareados do mobile (btnDevices).


JavaClass.Init()

Quando trabalhamos com arquivos Bridge, onde nossas classe são de origem java, temos que esquecer um pouco a forma que estamos acostumado a instanciar nossos objetos. Ao invés de utilizarmos o Construtor padrão, o método Create, iremos utilizar o método JavaClass.Init().


A Instância da variavel FService, será feita através da classe TJBluetoothService, neste caso TJBluetoothService.JavaClass.init(...).

function init(P1: JContext; P2: JHandler): JBluetoothService; cdecl;


O Método TJBluetoothService.JavaClass.Init exige dois parâmetros, “P1: JContext” e “P2: JHandler”.

Grande parte dos dispositivos que são integrados no Android apenas exigem apenas que seja informado a Activity responsável pelo dispositivo. Este modelo possui uma implementação um pouco mais complexa, vejamos:


No parâmetro "P1: JContext" iremos informar a Activity principal da nossa aplicação, para isso basta chamar o método MainActivity.

No parâmetro "P2: JHandler" temos que informar um objeto do tipo Handle do Android. Esse  Handle tem como objetivo manipular as mensagens/threads de um outro objeto especifico. Resumindo o Handle é o objeto que vai ficar "Escutando" as ações de um outro objeto, como se estivéssemos trabalhando com as mensagens do Windows para capturar um evento de um componente.

Handle Android


Para instanciarmos um Handle também chamaremos o método JavaClass.Init, e iremos precisar informar outros dois parametros, “looper: JLooper” e “callback: JHandler_Callback”.


function init(looper: JLooper; callback: JHandler_Callback): JHandler;

O Looper define quem será responsavel por gerenciar a fila de execuções de mensagen, e o Callback de capturar as mensagens executadas.


Para parametro "looper: JLooper" vamos atribuir o Looper da aplicação mesmo, TJLooper.JavaClass.getMainLooper.

Para o parametro "callback: JHandler_Callback", que é o objeto que recebera as mensagens atribuídas ao Handle, não temos uma classe ou método que nos instâncie ou retorne o objeto pronto, temos que criar no braço, o que não é nenhum bixo de 7 cabeça... Depois que você sabe o que está fazendo.

JHandler_Callback


Nossa classe de Callback ficará da seguinte forma:


THndCallback = class(TJavaLocal, JHandler_Callback)
public

 constructor Create;
 function handleMessage(msg: JMessage): Boolean; cdecl;
end;

constructor THndCallback.Create;

begin

end;


function THndCallback.handleMessage(msg: JMessage): Boolean;
begin

 Result := True;
end;

Como nosso objetivo é fazer a implementação da impressora da forma mais simples possível não iremos implementar praticamente nada nesta classe. No método handleMessage implementaremos apenas o “result:= True”, para que não tenhamos nenhum Warning, mas seria aqui que você manipularia os eventos da impressora, como um possível OnConnect, por exemplo.

Nesta classe também temos um detalhe muito importante, o Construtor, para criarmos uma classe de Callback o construtor da classe TJavaLocal não pode ser executado, então devemos declará-lo em nossa classe mesmo que vazio.

Agora temos todos os elementos necessário para iniciar nossa variável a instância do TJBluetoothService fica assim:


procedure TForm1.InstaciarServicoDeImpressao;

var

 lHandler: JHandler;

begin

 lHandler := TJHandler.JavaClass.init(TJLooper.JavaClass.getMainLooper,                    

                                      THndCallback.Create);

 FService := TJBluetoothService.JavaClass.init(MainActivity, lHandler);

end;


Com nossa variavel FService instanciada agora é efetuar a programação das funcionalidades propriamente ditas.

Listando dispositivos pareados


Agora vamos listar os dispositivos Bluetooth pareados.
O Delphi já possui métodos que listam os dispositivos pareados, mas alguns fabricantes trabalham com classes de dispositivos própria, o que não é o caso do nosso fabricante, que retorna uma lista de objetos que implementam a inteface JBluetoothDevice, que é a interface base para Devices bluetooth no Delphi.

Utilizaremos o método do fabricante e não o do Delphi, assim qualquer problema com a integração com a API da impressora será possível identificar logo na listagem dos dispositivos.

O JBluetoothDevice possui o método getPairedDev, que retorna a lista dos dispositivos, dessa forma iremos declarar uma variável global para armazenar nossa lista. O tipo de retorno do método getPairedDev é um JSet;

JSet


No tipo JSet, a manipulação da lista é um pouco mais complexa que as que estamos acostumado a utilizar no Delphi. Para manipulá-lo utilizamos o método
iterator do que por sua vez retorna um tipo JIterator, e é nele que percorremos os registros.

Aí vai a receita de bolo:

var
 lIt: Jiterator;
 lDevicePareado: JBluetoothDevice;

begin  
 lIt:= FDeviceSet.iterator;

 while lIt.hasNext do
 begin
   lDevicePareado :=

     TJBluetoothDevice.Wrap((lIt.next as ILocalObject).GetObjectID);
   Memo1.Lines.Add(jstringtostring(lDevicePareado.getName)+'='+

                   jstringtostring(lDevicePareado.getAddress));

   if jstringtostring(lDevicePareado.getName) = 'HHW-UART-S10' then
   begin
     FDevice := lDevicePareado;
     Memo1.Lines.Add('Pareamento de impressora Localizado');
   end;
 end;

Cada registro no nosso iterator retorna um Dispositivo pareado, que é atribuímos para a variável local lDevicePareado.

Para visualizarmos os Devices pareados buscamos o Nome (lDevicePareado.getName) e o endereço de Mac (lDevicePareado.getAddress), e jogamos para o Memo na tela. Por fim identifico o nome do meu dispositivo referente a impressora e atribuo a uma variável global chamada FDevice.

Estou identificando qual Device pareado é a impressora apenas efetuando um teste pelo nome do Pareamento, em sua aplicação você deve montar uma tela ou combo para que o usuário identifique qual dos itens da lista é a impressora e o selecione.

Outro ponto importante que vale mencionar é que o método getPairedDev não vai localizar a sua impressora, ele apenas lista os dispositivos pareados, dessa forma o Android listará todos os dispositivos pareados, independente de estarem ligados ou não. Se listarmos os dispositivos mesmo com a impressora desligada ela poderá aparecer em nossa lista por já ter sido pareada anteriormente.  

Observe também que os retornos se dão em JString, ou seja Strings do Java, dessa forma devemos usar o método jstringtostring da unit Androidapi.Helpers para convertê-las em strings do Delphi.

Conexão com a Impressora


Tendo o Device mapeado vamos fazer a conexão, para isso basta chamar o método connect da variavel FService passando como parametro o Device que queremos conectar.

FService.connect(FDevice);


Ponto importante, as conexões com os dispositivos bluetooth demoram, em meus testes uma média de 2 segundo, o que representa quase um eternidade em termos de processamento, e o suficiente para você não poder efetuar um teste de impressão imediatamente após a conexão.


Status da conexão


Neste exemplo eu coloquei um botão para retornar o status da impressora, poderia testar através de um Timer ou mesmo na classe de Callback, mas por simplicidade coloquei em um botão.


function TForm1.ObterStatus: string;

var

 lStateCod: integer;

begin

 lStateCod := FService.getState;


 if lStateCod = TJBluetoothService.JavaClass.STATE_CONNECTED then

   Result := 'CONNECTED'

 else if lStateCod = TJBluetoothService.JavaClass.STATE_CONNECTING then

   Result := 'CONNECTING'

 else if lStateCod = TJBluetoothService.JavaClass.STATE_LISTEN then

   Result := 'LISTEN'

 else if lStateCod = TJBluetoothService.JavaClass.STATE_NONE then

   Result := 'NONE'

 else Result := 'Não identificado';

end;


procedure TForm1.btnStatusClick(Sender: TObject);

begin

 try

   Memo1.Lines.Add('Status: '+ ObterStatus);

 except on E:Exception do

   Memo1.Lines.Add(e.Message);

 end;

end;


Com este teste posso verificar a qualquer momento estado da impressora.


Se ela estiver com o Status STATE_CONNECTED podemos enviar o comando de impressão.


Impressão


O Comando de Impressão por si só é extremamente simples:


procedure TForm1.Imprimir(pTexto: string);

begin

 FService.sendMessage(StringToJString(pTexto),StringToJString('GBK'));

end;


procedure TForm1.btnImprimirClick(Sender: TObject);

begin

 Imprimir(edit1.Text);

end;


Conclusão

A integração de qualquer dispositivo bluetooth em aplicativos mobiles feitos em Delphi na maior parte das vezes pode ser feita de maneira muito simples e rápida, mas é preciso que o programador esteja familiarizado com a API do Android.

Em nosso artigo mostramos que o Delphi possui estrutura para uma completa integração com de seus aplicativos mobiles e dispositivos bluetooth com um alto ganho de produtividade


Read More

По следам вебинара: RAD Server для разработки современных корпоративных систем

$
0
0

В прошлую среду мы провели вебинар "RAD Server для разработки современных корпоративных систем", на котором присутствовало много новых слушателей, и само собой, тех, кто давно приходит послушать наши рассказы о новейших и традиционных технологиях компании Embarcadero Technologies. 

Это был рассказ-знакомство с новым продуктом, который предлагает Embarcadero. В кратком обзоре мы рассказали о назначении, возможностях и особенностях решения, отличиях RAD Server от других продуктов Embarcadero, таких, как EMS, DataSnap, RAD Studio.

RAD Server – это готовая «под-ключ» back-end платформа, чтобы быстро создавать и развертывать свои прикладные сервисы. До появления RAD Server разработчики создавали back-end серверы приложений для Delphi и C++ Builder с использованием разных наборов инструментальных средств, таких как DataSnap. При этом у разработчиков имелось немного базисных компонентов для серверов приложений, но большая часть разработки оставалась для кодирования разработчиками.

С помощью RAD Server, разработчики теперь могут просто загрузить написанные на Delphi и C++ методы, которые и реализуют бизнес-логику, добавить необходимое число пользователей и начать работу.  На вебинаре было рассказано:  

  • Как создаются и управляются конечные точки REST/JSON
  • Как применяется контроль доступа. 
  • Как подключиться к любой используемой на предприятии СУБД и облачному сервису. 
  • Как отслеживать и реагировать на местоположение пользователя и посылать уведомления 
  • Как интегрировать интеллектуальные устройства IoT в свое решение. 
  • Как размещать RAD Server в облаке - публичном или частном

Слайды вебинара находятся здесь: http://goo.gl/IZ2I7k

Запись трансляции можно посмотреть на YouTube: https://youtu.be/piL0oLtvjsA

Приглашаем посетить наши следующие вебинары для разработчиков. 

Ближайший из них пройдет в эту среду - 6 июля, в 12:00 по Московскому времени и будет посвящен рассказу о конкретном примере VCL приложения для работы с метаданными графических файлов. еще можно успеть зарегистрироваться.

Ждем вас! 


Read More

Notification Center - ローカル 通知

$
0
0

 アンドロイド、iPhoneなどのスマートフォンを日常的にお使いになられている方は、通知領域、画面上部になにかしらのテキストが表示されるのを見ているかと思います。

アプリ開発の視点から見ると、この通知、発行設定さえしてしまえば、アプリが終了していてもスケジュールされたタイミングに発行してくれるので便利です。また通知をタップした場合に、そのタップ合わせて何らかのアクションを起こせるので、これもまた便利なものです。

Rad Studioにおいてこの通知機能は iOS, Androidともに下記API(コンポーネント)で実装します。


Read More

MVP Spotlight: Cary Jensen

$
0
0

Cary JensenThere are a handful of people who I believe are key to the developer community, and Cary Jensen is one of them. He’s been a rock in the community since the beginning. Even before Delphi he was instrumental with the Turbo Pascal community.

Cary consults, writes, presents, and trains on Delphi, databases and other related technologies. Cary’s authored over 20 books, with his latest being Delphi in Depth: ClientDataSets, 2nd EditionHe’s also presented multiple RAD-in-Action webinars online. You can catch the replays and check out the accompanying white papers.

Delphi Developer DaysI met Cary the first time in Darmstadt, Germany at the Entwickler Konferenz, aka EKON. I think it was lucky #13. I thought it was rather ironic that we were both from the US, but finally met in Germany. Since then I’ve met with him a few more times in Germany, and he invited me as a guest presenter at his Delphi Developer Days.

Nick HodgesIf you’ve not been to one of his Delphi Developer Days then you really should do what you can to attend this year. Each year he teams up with a co-host, and this year it is none other than Nick Hodges. They just opened registration for the 2 day event, so act fast to take advantage of the very early bird discount.

  • Chicago, Illinois – November 14-15, 2016
  • Baltimore, Maryland – December 5-6, 2016
  • Copenhagen, Denmark – November 24-25, 2016
  • Frankfurt, Germany – November 28-29, 2016

And if none of those date work, then you can catch Cary back in Darmstadt for EKON 20 on November 7th.


Read More

Brutally Roll Your Own Backend – Part 5

[C++ Builder VCL] Make your applications talkative and listening applications by using SAPI ( Speech Synthesis & Speech Recognition)

$
0
0

Let's make your C++ VCL applications talkative :D May be another wife  :D

This is my first blog post here so I start with stimulating an old Delphi article http://edn.embarcadero.com/article/29583 about Microsoft's SAPI library for Speech Synthesis & Speech Recognition which is edited by Brain Lang. So there is much more information about this old article which is very helpful if you want to do that on Delphi.

More details about SAPI can be officially found here https://msdn.microsoft.com/en-us/library/ee125663(v=vs.85).aspx

and here https://msdn.microsoft.com/en-us/library/ee125077(v=vs.85).aspx


If you read and get some info from the links above now lets start to code our simple C++ Builder VCL example which will work on XE versions. 

Part I: Text To Speech in C++ Builder

1. Create a new C++ Builder VCL Project, add Edit and Button from component palette. Now we will add SAPI API (Type Library) as a component and its wrappers. Select Component->Import Component.. from the menu of C++ Builder as shown below

2. Select "Import a Type Library" and go Next

3. Type SAPI ( or you can type any category to the Palette Page and make sure  Generate Component Wrappers is checked as below


4. Select Microsoft Speech Library (be sure that it is sapi.dll) from Registered Type Libraries. My version is 5.4 on Windows 10, yours may be different

and go Next

6. Select "Add unit to ..." and Finish

7. Click View Units or hit F12 you will see all units of your files. Now lets save all files to a folder that we know.

 SpeakingAPI Files

First Create a "SpeakingVCL" folder on your desktop or on your code projects folder. We will save everything to this SpeakingVCL folder. 

Select Unit1.cpp from the list by hitting F12 and save it as "SpeakingVCL_Unit1.cpp" to 

Select "SpeechLib_OCX.cpp" and "SpeechLib_TLB.cpp" and save both to folder in their names.

Now we can save this new project by Save Project As from menu with those new changes

save PCH file as "SpeakingVCL_Project1PCH1.h" and save project as "SpeakingVCL_Project1.cpp"

Now lets check your project folder it should be like this

8. Now select Unit1 to add Voice component and see your form by hitting (or double hit) F11. When we installed SAPI type library it is also added components to the SAPI category on your Component Palette (if you didn't type anything it may be found on ActiveX category). Or you can find them by typing "TSp" to the search of Component Palette.

Drag TSpVoice to your form and double click to Button1 and add lines inside  it to set Rate, Volume  of SpVoice1 and let it say

	Form1->SpVoice1->Rate=2; // Set Rate of Voice

	Form1->SpVoice1->Volume=100;  //Set Volume of Voice

	Form1->SpVoice1->Speak(Edit1->Text.w_str(), SpeechVoiceSpeakFlags::SVSFlagsAsync );  // Say Text and continue

    // if you want to wait speaking use this flag SpeechVoiceSpeakFlags::SVSFDefault

Now you can run your example by hitting F9


This simple full project can be found here SpeakingVCL. It doesnt work if you didn't add SAPI Type Lib as explained above.


Part II: Speech Recognition in C++ Builder VCL

1. Add Memo1 and another button (Button2) to your form to listen. Change caption of Button to "Listen"

    Drag  TSpSharedRecoContext1Recognition of SAPI from Components Palette to your form. You may also use TSpInprocRecognizer too.

2. Now lets obtain data when MS Speech Recognition is used. Select your SpSharedRecoContext1Recognition1 , go to events of this component, double click OnRecognition and  add this line inside 

   Memo1->Lines->Add( Result->PhraseInfo->GetText(0, -1, True) );


2. Go to SpeakingVCL_Unit1.h add ISpeechRecoGrammar *SRGrammar; to the public of Form1 as below. 

 public: // User declarations

__fastcall TForm1(TComponent* Owner);

ISpeechRecoGrammar *SRGrammar;


3. Back To Form1 double click to "Listen" captioned Button2 add these lines;

SpSharedRecoContext1->EventInterests = SpeechRecoEvents::SREAllEvents;

SRGrammar=SpSharedRecoContext1->CreateGrammar(Variant(0));

SRGrammar->CmdSetRuleIdState(0, SpeechRuleState::SGDSActive);

SRGrammar->DictationSetState(SpeechRuleState::SGDSActive);

4. Your final Unit of Form1 will be like this

//---------------------------------------------------------------------------

#include <vcl.h>
#pragma hdrstop

#include "SpeakingVCL_Unit1.h"
//---------------------------------------------------------------------------
#pragma package(smart_init)
#pragma link "SpeechLib_OCX"
#pragma resource "*.dfm"
TForm1 *Form1;
//---------------------------------------------------------------------------
__fastcall TForm1::TForm1(TComponent* Owner)
	: TForm(Owner)
{
}
//---------------------------------------------------------------------------
void __fastcall TForm1::Button1Click(TObject *Sender)
{
	Form1->SpVoice1->Rate=2;
	Form1->SpVoice1->Volume=100;
	Form1->SpVoice1->Speak(Edit1->Text.w_str(), SpeechVoiceSpeakFlags::SVSFlagsAsync );  //SpeechVoiceSpeakFlags::SVSFDefault

}
//---------------------------------------------------------------------------
void __fastcall TForm1::SpSharedRecoContext1Recognition(TObject *Sender, long StreamNumber,
		  Variant StreamPosition, SpeechRecognitionType RecognitionType,
		  ISpeechRecoResult *Result)
{
	Memo1->Lines->Add( Result->PhraseInfo->GetText(0, -1, True) );
}
//---------------------------------------------------------------------------
void __fastcall TForm1::Button2Click(TObject *Sender)
{
	SpSharedRecoContext1->EventInterests = SpeechRecoEvents::SREAllEvents;

	SRGrammar=SpSharedRecoContext1->CreateGrammar(Variant(0));
	SRGrammar->CmdSetRuleIdState(0, SpeechRuleState::SGDSActive);
	SRGrammar->DictationSetState(SpeechRuleState::SGDSActive);
}
//---------------------------------------------------------------------------

5. Now you can test and run your application by hitting F9. That's all !

 Full project package can be found here SpeakingVCL2


To get better results you need to train MS Speech Recognition by your voice, also you might  need more tweaks. You may use other classes of SAPI too. In windows 10; there is Cortana speech recognition is working nice with less languages supported. It is still under development. I can briefly say it is much more successfull then MS Speech Recognition. But its api is not shared yet. It works on windows and uses your apps as a tool. There is a way to use Cortana by XAML or you can use cooperative running application with your VCL/FMX application. I am waiting new update on Windows 10. After that may be we can discuss this again.

On Android Google's Text To Speech & Recognition API is very successful. There is a wrapper example on Jim McKeeth's github on Delphi and C++ but it's components can be compiled on RADs only because of Delphi base.

https://github.com/jimmckeethhere


On iOS i need time to check and test. May be someone adds here.


I hope these simple examples helps to your applications.

Please share your comments below and versions of your RADS.


Read More

Brutally Roll Your Own Backend – Part 8

$
0
0

lamp-stack (1)

Brutally Roll Your Own is a video series on building a PUSH enabled mobile application from scratch, using a Linux, Apache, MySQL, PHP (LAMP) server for the back end, and Delphi for the mobile app. In Part-8 we flesh out that REST endpoint class and add an animation to our main form to indicate responsiveness during HTTP calls.
Remember that this is all unscripted and off the cuff!

Sign up with linode here

Sign up for Linode by clicking here!
If you select linode to host your back end, as I suggest in part 2 of this video series, please consider signing up through my referral link above. I host my servers (including this site) on linode, and this will help pay the bills! If you already have an account, you can enter this referral code: fb41cc68526abce4ffa14bfd797d5c4cc684f192  Your support is appreciated!

[Listing of all parts]


Read More

MEET EMBARCADERO TOKYO 2016 [Japan]

$
0
0

本日はイベントのお知らせです。

エンバカデロ・テクノロジーズは、アイデラ傘下の新体制のもと、新バージョンのRAD Studio 10.1 Berlinのリリースを行いました。また、さらに将来のバージョンへの投資を続けており、今後とも開発ツールのデベロップメントと提供に集中して行きます。

さて、そんな中、エンバカデロテクノロジーズのジェネラルマネージャーのアタナス ポポフ (Atanas Popv) が来日します。アタナスはエンバガデロの実務最高責任者であります。その彼がデベロッパーの皆さんに対し、プレゼンテーションと、意見交換の場を持つ 「Meet EMBARCADERO TOKYO 2016」を開催します。実務最高責任者と直接意見交換できる最高のチャンスです。この場を活用し、ぜひ皆様の熱い思い、ご意見をお寄せください。(通訳付き)

事前申し込み、参加費が必要となります。詳細は下記のリンクをご参照ください。
イベント終了後は会場近辺で懇親会も予定しており、オフィシャルなミーティングよりもさらに濃く、活発な意見・情報の交換も楽しめることでしょう。

日程:2016720日(水) 18:00~19:30 (20時より懇親会)

会場: エンバカデロ 飯田橋オフィス セミナールーム

参加費:3000

詳細はこちらのWebをご参照ください: http://forms.embarcadero.com/MET2016


ちなみに 「RAD Studio勉強会@大阪」 の皆さんはリモートオンライン接続でこの Meet Embarcadero Tokyo 2016への参加を予定されていらっしゃいます。

関西方面の方は、 こちらのWebもご参照ください : https://rad-studio-osaka.doorkeeper.jp/events/48751


お楽しみに!


Read More

По следам вебинара: Будильник для Android в FireMonkey

$
0
0

Оказывается, что остались пользователи, которые в силу тех или иных причин не были информированы о летних вебинарах Embarcadero. Прискорбненько! Мы постараемся обязательно исправить ситуацию.

Но это еще раз подчеркивает ценность наличия материалов для "оффлайн"-просмотра. Стали доступны запись и слайды вебинара с загадочным заголовком "Будильник для Android в FireMonkey".   За этим набором слов скрывается рассказ о целом классе задач и одном из способов решения в среде Delphi-Android

Средства операционных систем мобильных устройств часто уже имеют специальные механизмы, которые можно использовать при разработке на Delphi. Однако, если реализация приложения, которое должно реагировать на внешние события, требует, чтобы приложение постоянно находилось в памяти и постоянно работало, то это приложение в реальности на мобильных устройствах будет не работоспособно, и такая реализация не допустима.

Что требуется, чтобы решение сработало даже, когда приложение закрыто? На вебинаре рассказывается, как написать такую программу на Delphi, которая сможет использовать встроенные в Android сервисы, и создать приложение-«Будильник», использующий Android AlarmManager

В основу рассказа была положена статья Я.Бровина и технические заметки Embarcadero MVP - Андрея Ефимова. В ходе наглядной демонстрации были выполнены все необходимые шаги для создания и добавления собственных JAVA-классов в приложение, написанное на Delphi и FireMonkey, его компиляции, сборки и установки на Android-планшет.

Запись трансляции на канале YouTube: https://youtu.be/A9QlP6B4gGA 

Слайды вебинара: http://www.slideshare.net/asovtsov/13072106-android-firemonkey 

Статья Я.Бровина: http://goo.gl/gYjyR2 Здесь же можно скачать исходные тексты примера.

Ждем всех на следующих вебинарах для русскоязычных разработчиков в августе-сентябре!


Read More

Extreme Delphi Rio - Eu Fui

$
0
0

Existe um evento que vem rodando o Brasil e sacudindo a comunidade Delphi por onde passa. Esta semana, nos dias 16 e 17 de julho, foi a vez do Rio de Janeiro.

A Cidade Maravilhosa lotou o evento produzido pelo Embarcadero MVP brasileiro, Rodrigo Mourão com mais de 50 participantes.

Fiz um post no meu blog sobre como transcorreu o evento enquanto estive por lá, então faça a leitura... veja as fotos e fica a dica de um evento imperdível que com certeza vai passar perto de você!

Leia a postagem completa

Acesse: http://vivaitaocara.com.br/landersongomes/embarcadero/delphi/extreme-delphi-rio-eu-fui

Extreme Delphi Rio


Read More

Free Webinar: C++ Boot Camp

$
0
0

Learn the fundamentals of C++ development with C++Builder using the cross platform enabled FMX framework in just one week. 

Register now to join Industry experts, including David I and David Millington, for 5 awesome packed online sessions (starting 8th August) and claim your very own C++Builder license that you can keep after the course. 

  • Day 1 – Building your first application with C++Builder. 
  • Day 2 – Creating fast responsive user interfaces with awesome no code animations and effects. 
  • Day 3 – C++11 language deep dive 
  • Day 4 – Game development with C++ 
  • Day 5 – Stepping up to mobile 

Sessions are repeated twice each day, for attendees in different time zones.

 Session  PDT
 (eg Los Angeles)
 BST
 (UK)
 CEST
 (eg Germany)
 JST
 (Japan)
 AEST
 (eg Sydney)
 First session  6:00AM - 8:00AM   2:00PM - 4:00PM   3:00PM - 5:00PM   10PM - 12AM   11PM - 1AM 
 Repeated session   11:00AM - 1:00PM   7:00PM - 9:00PM   8:00PM - 10:00PM   3AM - 5AM 
 (next morning) 
 4AM - 6AM 
 (next morning) 

...for each day of the boot camp:

  • Mon, Aug 8, 2016
  • Tue, Aug 9, 2016
  • Wed, Aug 10, 2016
  • Thu, Aug 11, 2016
  • Fri, Aug 12, 2016

[Register Now]


Read More

Using CMake with the free Embarcadero C++ compiler

$
0
0

Do you want to use CMake with the newly released free compiler? This post quickly runs you through installing both the compiler and CMake, and shows an example build using two C++ files and the corresponding CMakeLists.txt.

CMake is a popular third-party build tool.

Ensuring the compiler is installed

To start, make sure you have the compiler in your system path. (When you download and extract it, you need to add the \bin folder to your system path. Doing so is outside the scope of this blog post but there are full instructions in the installation readme in the download.) To test this, open a command prompt by typing 'cmd' in the Windows Search box and selecting 'Command Prompt'. In it, type 'bcc32c' and you should see a message with the version number, followed by a warning that you didn't give it any files to compile. (If you want more details, by the way, type 'bcc32 --version'.) If you get an error that bcc32c is not found, you need to add the extracted download's \bin folder to your system path.

Installing CMake

CMake is a third-party tool and you need to install it separately. Head to cmake.org's download page, and choose the latest version's binary installer - 32 or 64-bit, up to you. For this post, I downloaded cmake-3.6.0-win64-x64.msi. Run it, and after installation make sure it is installed correctly by again opening a command prompt and this time typing 'cmake'. You will get a message telling you about its usage. If you don't, you may need to restart or log and and log in again for the program to be found.

Using CMake

CMake builds based on a text file called CMakeLists.txt. You can find more information in their developer documentation.

We're going to make a sample project that consists of three parts:

  1. Two C++ files and a header - this is the source we want to build
  2. CMakeLists.txt
  3. A batch script to drive it

Let's start with the source.

C++ source

Using Notepad or another text editor, save the following three files to disk in a good location (say, Documents\CppProjects\CMakeTest.)

Simple.cpp - this is the main module:


#include "funcs.h" 

int main(void) {
	const auto a = 4;
	const std::string str = GetMessage();

	std::cout << str << std::endl;
	PrintResult([=]() { return a + str.length(); });
}

Funcs.cpp:

#include "funcs.h"

std::string GetMessage()
{
	return "Hello world.";
}

and funcs.h:

#include <string>
#include <iostream>

template <typename F>
void PrintResult(F f)
{
	std::cout << f() << std::endl;
}

std::string GetMessage();

Together these form a program that demonstrates a couple of C++11 features: auto, lambdas, and passing a lambda to a template function. In fact you can compile these manually without using CMake by calling bcc32c on the command line:

bcc32c simple.cpp funcs.cpp

and you will find a 'simple.exe' file in the same folder as the source.

However, we want to use CMake, so you can skip that and create a CMakeLists.txt file.

CMakeLists.txt

This file tells CMake which files to build - and can contain a lot more complex information, such as dependencies. We're going to write a very simple one, though, that tells CMake to build all the .cpp files in the current folder.

In Notepad, create a new file and paste in the following, saving it as CMakeLists.txt in the same folder as the source:

cmake_minimum_required (VERSION 2.6)
project (Example)

file(GLOB Example_SRC
    "*.h"
    "*.cpp"
)

add_executable(Example ${Example_SRC})

This defines a project called Example, tells it to find all .cpp and .h files, and build them in one executable. A full CMake file might list all file individually, but this is simple and easy to demonstrate.

Batch script to drive Cmake

Finally, we want a batch file to drive CMake. Create another new text file in Notepad, and paste in the following:

REM Make sure cmake.exe , bcc32c.exe and borland make.exe are in the Path
@echo off
mkdir build
cd build 
cmake -G"Borland Makefiles" -DCMAKE_CXX_COMPILER="bcc32c.exe" -DCMAKE_C_COMPILER="bcc32c.exe" -DCMAKE_VERBOSE_MAKEFILE=1 ..
make
cd ..
echo CMakeBCC: Results available in 'build' folder

Save this file in the same folder as the source and CMakeLists.txt, with the filename 'cmake_bcc32c.bat'. Make sure it really does have the .bat extension, not .txt.

This batch file creates a subfolder called 'build', where all results will be placed. (CMake can create a large number of extra files.) It then invokes CMake using the Borland generator - that's because bcc32c has the same command-line interface (same flags) as the old, classic bcc32 compiler.

On the command line, run this by typing 'cmake_bcc32c.bat.'  You will see a lot of output, but at the end you should find a 'build' folder that contains 'Example.exe' along with many other files.

Final notes

We're using CMake's Borland generator here, because bcc32c is compatible with bcc32's command-line flags. Bcc64 isn't, so using it is more complicated. We're investigating working with CMake to get native support for the new Clang 64-bit compiler. Get in touch with us if this is important to you.

We're also running a C++ boot camp in the second week of August. It's a couple of hours long each day for five days, covering a wide range of C++ topics from using FMX, our cross-platform UI framework, to a C++ language deep dive, building games, and writing an app (or porting to) mobile devices like an iPhone or Android phone or tablet. Lots of interesting stuff - you can register here.


Read More

Perfiles de audio

$
0
0

Continuando con la entrada anterior del blog, donde hablaba de cómo acceder a las propiedades de audio de un dispositivo Android; La idea de esta entrada es avanzar un poco más en el tema y generar una aplicación que nos permita gestionar varios perfiles de audio en nuestro dispositivo.

Una vez que vimos cómo acceder a la información del volumen actual, lo siguiente que nos interesa es poder almacenar diferentes perfiles, de forma que podamos seleccionar uno de los perfiles y configurar todos los parámetros de audio de forma rápida y automática.

Además debemos poder editar los perfiles existentes, borrar os que no nos interesen y tener la posibilidad de crear nuevos.

Contaremos con una serie de perfiles predefinidos, que podrían ser similares a estos:

  • Normal (Volúmenes al 100%)
  • Bajo (Volúmenes al 20%)
  • Sólo llamadas (todo al 0% excepto las llamadas)
  • Silencio total (Todo al 0%)

PROCEDIMIENTO PARA MODIFICAR EL VOLUMEN

audio_icon_29Si las funciones que tenemos disponibles para obtener el volumen de una determinada característica veíamos que son estas:

Para modificar el volumen de una de estas características contamos de forma análoga con el método:

Si miramos la definición del método en la unit AndroidAPI.JNI.Media, podemos ver lo siguiente:

JAudioManager = interface(JObject)
...

procedure setStreamVolume(streamType: Integer; index: Integer; flags: Integer); cdecl;
...
end;

Vemos que de forma similar a getStreamVolume, el procedimiento setStreamVolume admite un primer parámetro para el Stream (característica):

int    STREAM_ALARM:        The audio stream for alarms
int    STREAM_DTMF:         The audio stream for DTMF Tones
int    STREAM_MUSIC:        The audio stream for music playback
int    STREAM_NOTIFICATION: The audio stream for notifications
int    STREAM_RING:         The audio stream for the phone ring
int    STREAM_SYSTEM:       The audio stream for system sounds
int    STREAM_VOICE_CALL:   The audio stream for phone calls

Un segundo parámetro para fijar el nivel de volumen, teniendo en cuenta que el máximo no es el 100% (como se podría pensar en un principio), sino que debemos obtenerlo con el método getStreammaxVolume.

Y el tercero, nos permite aplicar algunos flags, que modifican el comportamiento del método.

Si miramos en la unit AndroidAPI,JNI.Media, podremos encontrar las siguientes propiedades:

property FLAG_ALLOW_RINGER_MODES: Integer …;
property FLAG_PLAY_SOUND: Integer …;
property FLAG_REMOVE_SOUND_AND_VIBRATE: Integer …;
property FLAG_SHOW_UI: Integer …;
property FLAG_VIBRATE: Integer …;

Que equivalen a los que se especifican en la documentación de Android:

int FLAG_ALLOW_RINGER_MODES

Whether to include ringer modes as possible options when changing volume.

int FLAG_PLAY_SOUND

Whether to play a sound when changing the volume.

int FLAG_REMOVE_SOUND_AND_VIBRATE

Removes any sounds/vibrate that may be in the queue, or are playing (related to changing volume).

int FLAG_SHOW_UI

Show a toast containing the current volume.

int FLAG_VIBRATE

Whether to vibrate if going into the vibrate ringer mode.


PERFILES

Para almacenar los diferentes perfiles utilizaremos un fichero de texto (INI). La ubicación para almacenarlo será la siguiente:

TPath.GetSharedDocumentsPath

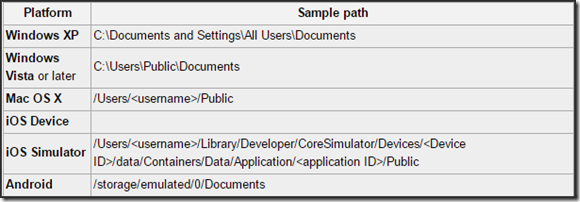
Para los diferentes sistemas la ubicación “física” del fichero

path_fisico

No es la única ubicación posible. Podemos seleccionar otras que se definen dentro de la clase TPath.

Aquí se puede ver una descripción de cada una de las ubicaciones que nos ofrece esta clase y su ubicación física en las diferentes plataformas.


PERMISOS NECESARIOS

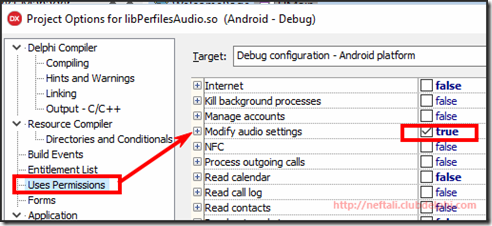
Será necesario modificar los permisos por defecto de la aplicación para que ésta pueda leer los valores del volumen actual y modificar los diferentes valores de cada Stream.

Si lo hacemos desde el fichero XML de manifest, deberemos asegurarnos de que la siguiente línea está presenta:

<uses-permission android:name="android.permission.MODIFY_AUDIO_SETTINGS" />

Si lo hacemos desde la configuración, deberemos marcar la casilla para este permiso.

audio_settings


LA APLICACIÓN

Una vez con todo esto y lo visto en la entrada anterior, ya podemos “crear” nuestra aplicación para gestionar los “Perfiles de Audio”.

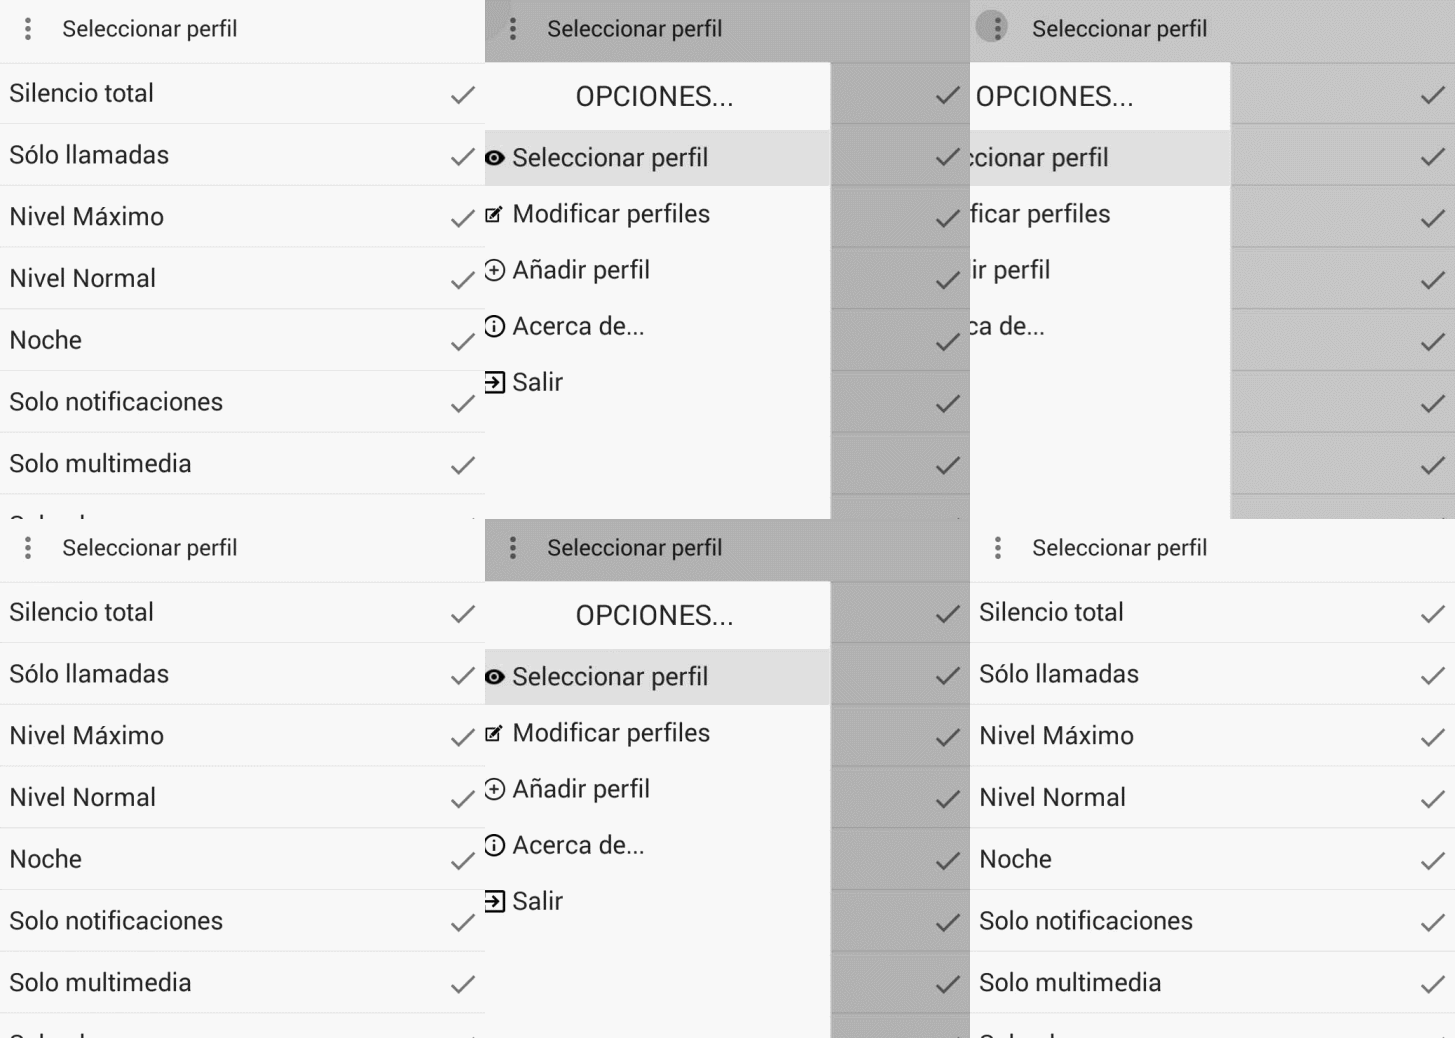
El menú principal nos muestra las siguientes opciones:

menu_principal

Inicialmente lo que haremos será proporcionar unos perfiles “Predefinidos”.

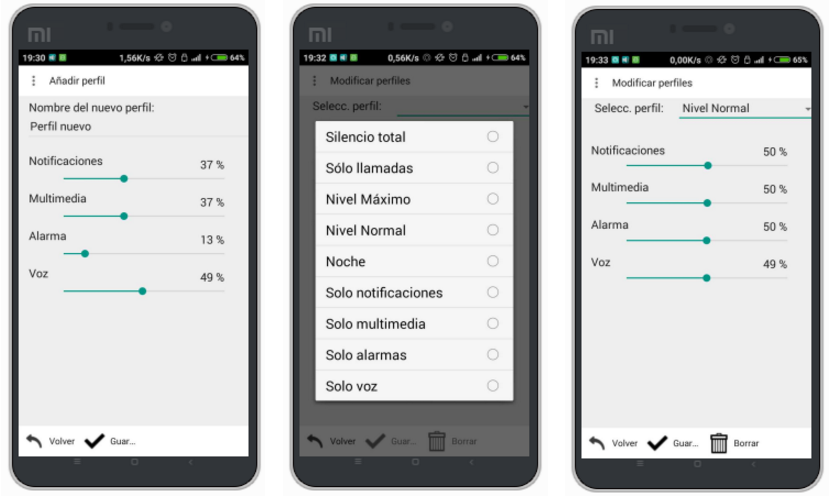
Tendremos la posibilidad de añadir un nuevo perfil o de modificar uno de los existentes:

menus_app

Y a continuación os muestro un vídeo con la aplicación funcionando.


Podéis descargar el código completo del proyecto en el siguiente link:

<CODIGO FUENTE DEL PROYECTO>

Un saludo y hasta la próxima.


Read More

TDevRocks - #TDevTips: Tips for everyone

$
0
0

#TDevTips - Dicas para todos os gostos


O blog TDevRocks estreou há pouco tempo uma coluna chamada #TDevTips com o objetivo e transmitir ao seu público vídeos de todos os tipos e diversos assuntos diferentes. Nós já falamos de suítes de componentes que ajudam o programador Delphi a melhorar ainda mais suas interfaces gráficas. Falamos sobre classes para detecção de internet/rede em dispositivos móveis e até abertura de arquivos PDF em iOS e Android.


O blog vem se destacando no Brasil por trazer sempre assuntos importantes à toda comunidade. Convidamos todos os leitores do Community a também conhecer nossos canais de comunicação. 


Facebook: fb.com/tdevrocks

YouTube: youtube.com/tdevrocks

Blog: www.tdevrocks.com


Muito obrigado, bons estudos e até a próxima.

#GoToDelphi

-----

In English


#TDevTips - Tips for everyone

The TDevRocks blog debuted recently a column called #TDevTips in order and convey to your public videos of all types and many different subjects. We have already talked suites components that help the Delphi programmer to further improve their GUIs. We talk about classes for internet detection / network on mobile devices and to open PDF files in iOS and Android.


The blog has been increasing in Brazil by always bring important issues to the whole community. We invite all readers of the Community to also meet our communication channels.


Facebook: fb.com/tdevrocks

YouTube: youtube.com/tdevrocks

Blog: www.tdevrocks.com


Thank you, good studies and to the next.


Ps. Sorry, we do not speak English very well. ;)


Read More

Useful C++ Features You Should Be Using: replay now available

$
0
0

The replay for last Thursday's webinar, 'Useful C++ Features You Should Be Using', is now available.

(or a direct Youtube link.)

The presentation and demonstration starts at 0:00:00, and the live Q&A at 00:26:30.

You can also find the slides on Slideshare, and download the source for David I's parallel programming demos.

The presentation mentions - and explains the use of -

  • Type inference, such as auto, giving examples including when replacing STL container types and iterating
  • Lambdas - a quick overview of how they work, and examples of using them with STL algorithms
  • Variadic templates and tuple<>
  • Smart pointers (both shared_ptr and unique_ptr) and a discussion of when to use each
  • New containers, atomic primitives, static assertions, and some C++Builder-specific features
  • And David I shows a live demo of using the Parallel Programming Library (PPL) with lambdas

Finally, here is the list of resources and useful links given at the end of the talk:


Read More

Brutally Roll Your Own Backend – Part 10

$
0
0

lamp-stack (1)

Brutally Roll Your Own is a video series on building a PUSH enabled mobile application from scratch, using a Linux, Apache, MySQL, PHP (LAMP) server for the back end, and Delphi for the mobile app. In Part-10 we add an input dialog which can be used to make adjustments to the regions and locations data tables.


Sign up with linode here

Sign up for Linode by clicking here!
If you select linode to host your back end, as I suggest in part 2 of this video series, please consider signing up through my referral link above. I host my servers (including this site) on linode, and this will help pay the bills! If you already have an account, you can enter this referral code: fb41cc68526abce4ffa14bfd797d5c4cc684f192  Your support is appreciated!

[Listing of all parts]


Read More

Brutally Roll Your Own Backend – Part 11

$
0
0

lamp-stack (1)

Brutally Roll Your Own is a video series on building a PUSH enabled mobile application from scratch, using a Linux, Apache, MySQL, PHP (LAMP) server for the back end, and Delphi for the mobile app. In Part-11 we complete our CRUD client class.

Sign up with linode here

Sign up for Linode by clicking here!
If you select linode to host your back end, as I suggest in part 2 of this video series, please consider signing up through my referral link above. I host my servers (including this site) on linode, and this will help pay the bills! If you already have an account, you can enter this referral code: fb41cc68526abce4ffa14bfd797d5c4cc684f192  Your support is appreciated!

[Listing of all parts]


Read More

Assembling the Evil Mad Scientist ISP Shield for Arduino.

$
0
0

I ordered two of these ISP Programming shields for my Arduino collection from Evil Mad Scientist, and decided to record myself assembling one of them. Just for fun.

I purchased the boards from Evil Mad Scientist here:
http://shop.evilmadscientist.com/productsmenu/tinykitlist/253-ispshield

I was actually disappointed when the boards arrived…

I was not disappointed by the product, but because I hadn’t properly read what I was buying! You see, I needed to be able to write boot-loaders onto Atmel328p chips so that I can build flight computers for my balloon experiments (using the chip and a board cut on my cnc mill, rather than flying a complete Arduino development board). The ISP Programmers from Evil Mad Scientist allow you to do this, but, you can also simply follow the instructions to build a programmer on the breadboard from the Arduino website.

So why would I buy them?

Well I wanted something that looked a little nicer and was a permanent PCB rather than a breadboard. I could easily have copied the breadboard design to a piece of pre-drilled PCB and used nothing but components already available in my electronics lab, but, I was being lazy. I ordered these ISP programmers thinking they were pre-assembled. When they arrived as kits, I wished I’d just built my own boards. Having said this, I’m pleased I didn’t – these look much better than anything I’d have put together.

Tip 1: The assembly instructions leave you with one “spare” component, a 0.01uF capacitor which the instructions actually suggest you keep as a gift. Don’t be quick to stuff that tiny component in a draw, you’ll actually need to insert it between the RST and GND pins of J4 to use this board with the Arduino Uno. This instruction doesn’t appear until you get to the documentation on using the programmers.

Tip 2: Put a piece of insulating tape over your USB socket on your arduino board, to keep it from shorting against the programmer PCB. The PCB is not manufactured with any spacing to prevent this, something which the documentation mentions and “humorously” suggests you buy one of Evil Mad Scientists “Googly board”, a spacer board for your Arduino with stick on googly eyes *ugh!* http://shop.evilmadscientist.com/productsmenu/tinykitlist/438-googly


Read More
Viewing all 1683 articles
Browse latest View live


<script src="https://jsc.adskeeper.com/r/s/rssing.com.1596347.js" async> </script>