Quantcast
Channel: Latest blog entries - Embarcadero Community
Viewing all 1683 articles
Browse latest View live

Learn to Program with Delphi Community Edition: Part 4 - Designing User Interfaces

$
0
0

Last time we have talked about the importance of app architecture and layers of code. David went one step further and started to build user interface for our calculator apps. This week I'm going to catch up and we will discuss designing user interfaces (UI) for our apps.

VCL and FMX

Clearly user interfaces are of the highest importance for the user experience (UX) of our app. In Delphi there are two libraries for building user interfaces. There is the Visual Component Library (VCL), which is probably the best way for building great applications for Windows. It was there since Delphi 1 and is being constantly improved and updated to support the latest Windows features including upcoming support for Windows 10 Anniversary Edition. The second library is FireMonkey (FMX). It has been designed from ground up for building user interfaces for all major desktop and mobile operating systems, including Windows, Mac, iOS and Android. In this series we are focusing on using FireMonkey as Delphi Community Edition allows you to build applications for Windows but also for mobile platforms.

The key benefit of Delphi and FireMonkey as that you can design your app once and from the same codebase you can natively compile for different operating systems, different form factors and orientations. That is a unique capability on the market today, but it also poses new challenges. How do you design your user interface so it is useful and looks great on different devices?

FireMonkey Advantage

Desktop and mobile user interfaces differ quite a lot but FireMonkey provide common abstractions that you can use to target different platforms. For example the "OnClick" event that we traditionally use to assign code to clickable controls like buttons also work for touch events on mobile where there is no mouse. Another difference is the fact that user interfaces (or in other words forms) are always displayed "maximized". On desktop the end user can resize the form, having it to occupy the whole screen or only its part. On mobile it is always "maximized" and the size of the form is the same as the size of the screen. However the user can change the orientation of the screen. In Project Options of your app you can decide which screen orientations your app is designed to support. By default all four orientations (two horizontal and two vertical). In terms of FireMonkey cross-platform abstractions you can programmatically react to changes in orientations in the "OnFormResize" event.

One of the key foundations of FireMonkey GUI library is the fact that different visual controls can "own" other controls. You can quickly see this parent-child containment relationships in the "Structure" view in the top left corner of the IDE. With a mouse you can drag controls to change their parents. 

When visually designing user interfaces you can use properties of different components to control how they are going to position themselves within their visual containers. One of the most important properties is "Align", which let you control alignment of a control. For example if you "Align" property to "Client" the control will occupy the whole available space. That's important because it will work regardless of the size of the device screen. You can also align to "top", to "bottom", "left", "right" and so on.

Using Layouts

When building user interfaces that need to look good at different form sizes, it is a good practice to group controls within a parent. Obviously you can use visual controls like "TPanel" for grouping, but in FireMonkey there are also layout components that do not have any visual representation at runtime. Their sole purpose is to group other visual controls. You can see different available layout controls in the "Layouts" category in the "Tool Palette".

The Calculator User Interface

In this blog post we are going to build the user interface for our simple calculator applications. The design of our app has mobile targets in mind. On mobile different user interface elements need to be big and there must be big spacing between them.

In the second post of the series, we have created “DelphiSuperCalculator” project that we are going to develop further today. The main form of the app is stored in the “uFormCalculator” unit. We need to have a clean slate. Double-click on the button that was added to the form last week and remove the one line of code that calls “ShowMessage”. If you save the form now, the empty “OnClick” event handler will disappear. Now turn back to the form and delete the button.

Now let's add the new features to it. Click somewhere on the form to select it and change its “Name” property from “Form1” to “FormCalc”. Change the “Caption” property of the form to “Delphi Super Calculator”. Save All. Now we have a good starting point to work on our user interface.

Change the "Width" of the form to "400" and "Height" to "500", so it looks like a phone-sized user interface. Drop on the form "TLayout" component. Change its name to "LayoutDisplay", For chancing the name of a component, you can use the QuickEdit common of the local menu (right click on the component):

Align the layout to the "Top" and change its "Height" to "100". This will be a place for our display. Drop a label on this layout. Align it to "Client". Change its "Name" to "LabelDisplay" and its "Text" property to "0". Expand "TextSettings" property, change the size of the font to "72" and the "HorzAlign" to "Trailing". Now it looks good:-)

Now drop "TGridLayout" component on the form. Align it to "Client" and rename to "GridLayoutButtons". This will serve as the visual container for all our buttons. Change "ItemHeight" and "ItemWidth" to "100". Now drop "TButton" component on the grid layout. Notice that it has been placed in the top left corner of the form. Expand its "Margins" property and change all four margins - "Bottom", "Left", "Right" and "Top" to "5". Now expand "TextSettings" property and change font size to "36". Now copy this button 13 times, so we have a grid of buttons with 4 columns and 4 rows. Change "Text" property of each button, so it has the right caption. Save all. In my case the user interface looks like this:

In the next blog post we are going to write some code to turn this user interface into a working calculator app!

Next in this Series

Part 1: Introduction and Installation

Part 2: Building and Debugging in Delphi

Part 3: Architecture and Layers

Part 4: Designing User Interfaces (this blog post)

Part 5: Putting the Calculator Together


Read More

Learn to Program with Delphi Community Edition: Part 5 - Putting the Calculator Together

$
0
0

Welcome to the last episode in the "Learn to Program with Delphi Community Edition" series. In the first four episodes we have covered "Introduction and Installation" of the free Delphi Community Edition, then we moved to IDE basics in "Building in Debugging". In "Architecture and Layers of Code" the key concepts of proper app structure were discussed and in the last episode we have started "Designing User Interfaces".

Application Logic

In the previous episode we have created the calculator project with the main form with 20 buttons and a label that acts as a "display". It is very important to separate user interface code from the application logic. The best way to achieve this separation is by using interfaces. However, This would add a little too much complexity for a starter series, so I'd rather stick to writing a separate class with the calculator logic.

First, we've added two new data types to the uCalculator unit. The first is an enumeration, as list of valid values for the "operation" of the calculator. The second is the actual class with the logic defined in a few methods and the status information, represented by a few fields, like any good class following object-oriented approach:

type
TOperatorEnum = (opNull, opAdd, opSubtract, opMultiply, opDivide); TCalcStatus = class private FInputValue: string; FCurrentTotal: Double; FOperation: TOperatorEnum; FDisplayTotal: Boolean; public constructor Create; procedure AddDigit(Digit: string); procedure AddDecimalSeparator; procedure CalcTotal; procedure NewOperation(Oper: TOperatorEnum); function DisplayValue: string; end;

The fields are used to store the current input string the user is typing, the total so far (from previous operations), the requested operation (that's going to be applied to next pair of values), and a Boolean flag indicating if the display needs to show the input value or the most recent total (something we'll do after the last operation but before the input starts again).

The methods have different roles. The two add operations, the NewOperator, and CalcTotal are involved directly when the various buttons are pressed in the UI. AddDigit would just pass the digit of the button that was presses, and NewOperation would do the same for the operation, triggering the calculation of the current input value. Here is their code:

procedure TCalcStatus.AddDecimalSeparator;
begin
  FInputValue := FInputValue +
    FormatSettings.DecimalSeparator;
end;

procedure TCalcStatus.AddDigit (digit: string);
begin
  FDisplayTotal := False;
  FInputValue := FInputValue + digit;
end;

procedure TCalcStatus.NewOperation(Oper: TOperatorEnum); begin CalcTotal; FOperation := Oper; end;

The CalcTotal method is the most important one, triggered by pressing the = button of any of the operations. Notice how this code uses the TCalculator class we wrote in the step 3 of the series. It also resets the display status, so that the DisplayValue method can be skewed one way or the other:

procedure TCalcStatus.CalcTotal;
var
  NewValue: Double;
begin
  NewValue := StrToFloatDef(FInputValue, 0);
  case FOperation of
    opNUll: FCurrentTotal := NewValue;
    opAdd: FCurrentTotal := TCalculator.Add (
      FCurrentTotal, NewValue);
    opSubtract: FCurrentTotal := TCalculator.Subtract(
      FCurrentTotal, NewValue);
    opMultiply: FCurrentTotal := TCalculator.Multiply(
      FCurrentTotal, NewValue);
    opDivide: FCurrentTotal := TCalculator.Divide (
      FCurrentTotal, NewValue);
  end;

// reset status FOperation := opNull; FDisplayTotal := True; FInputValue := ''; end;

function TCalcStatus.DisplayValue: string; begin if FDisplayTotal then Result := FloatToStr(FCurrentTotal) else Result := FInputValue; end;

Wiring the Buttons to the Code

The final step is to make sure the form uses the TCalcStatus class and the buttons call the proper methods. But first we need to create an actual instance of this object. We can add the object to the form class, in the private fields section, and initialize / free it in two specific event handlers, OnCreate and OnDestroy. This is the complete definition of the form class, with all of the components and the event handlers, plus a custom field and a custom method. A form is just a class, so it can be extended like any other class in your code:

type
  TFormCalc = class(TForm)
    LayoutDisplay: TLayout;
    LabelDisplay: TLabel;
    GridLayoutButtons: TGridLayout;
    Button1: TButton;
    Button2: TButton;
    Button3: TButton;
    ButtonPlus: TButton;
    Button4: TButton;
    Button5: TButton;
    Button6: TButton;
    ButtonMInus: TButton;
    Button7: TButton;
    Button8: TButton;
    Button9: TButton;
    ButtonMultiply: TButton;
    ButtonDecimanl: TButton;
    Button14: TButton;
    ButtonEquals: TButton;
    ButtonDivide: TButton;
    procedure ButtonNumberClick(Sender: TObject);
    procedure FormCreate(Sender: TObject);
    procedure FormDestroy(Sender: TObject);
    procedure ButtonDecimanlClick(Sender: TObject);
    procedure ButtonPlusClick(Sender: TObject);
    procedure ButtonMinusClick(Sender: TObject);
    procedure ButtonMultiplyClick(Sender: TObject);
    procedure ButtonDivideClick(Sender: TObject);
    procedure ButtonEqualsClick(Sender: TObject);
  private
    CalcStatus: TCalcStatus;
  public
    procedure Refresh;
  end;

procedure
TFormCalc.FormCreate(Sender: TObject);
begin
CalcStatus := TCalcStatus.Create;
end;

procedure TFormCalc.FormDestroy(Sender: TObject);
begin
CalcStatus.Free;
end;

For the 4 operations, the code is similar to the first OnClick event handler below. All operations are similar, but the event handlers are separate and so are the decimal separator and the = sign. For the numeric keys, instead, we've created a single event handler, hooked to all button (you do simply by selecting the a method for the event handler in the Object Inspector drop down list next to OnClick. This way the code is share and it relies on the "Sender" parameter, an object indicating which buttons was pressed, to access to the current button text (the number that was pressed). Here is the code:

procedure TFormCalc.ButtonDecimanlClick(Sender: TObject);
begin
  CalcStatus.AddDecimalSeparator;
  Refresh;
end;

procedure TFormCalc.ButtonEqualsClick(Sender: TObject);
begin
  CalcStatus.CalcTotal;
  Refresh;
end;

procedure TFormCalc.ButtonMultiplyClick(Sender: TObject);
begin
  CalcStatus.NewOperation (opMultiply);
  Refresh;
end;

procedure TFormCalc.ButtonNumberClick(Sender: TObject);
begin
  CalcStatus.AddDigit ((Sender as TButton).Text);
  Refresh;
end;

procedure TFormCalc.Refresh;
begin
  LabelDisplay.Text := CalcStatus.DisplayValue;
end;

Notice that almost each of the event handles includes a call to the Refresh method to update the UI. Ideally, the request to refresh the UI would come directly from the business logic via an interface, a nice future extension to this project.

Testing the Final Project

With all of this code written, we can now runt the final application and test it. I know it has some quirks I left in to avoid overcomplicating the code, but most of the basic operations work fine. Here is the application running:

What About Mobile?

For the sake of this initial series of blog posts meant to discover Delphi Community Edition, we have only focused on Windows. But this application can be easily recompiled for mobile platforms, something we'll focus on a follow up blog post.

What's Next

This is for now the end of the series, and here are the links to the previous posts. More will be added soon.

Part 1: Introduction and Installation

Part 2: Building and Debugging in Delphi

Part 3: Architecture and Layers

Part 4: Designing User Interfaces

Part 5: Putting the Calculator Together (this post)


Read More

Introducing Delphi and C++Builder Community Edition

$
0
0
Today is a very exciting day for our community. For many years, we've gotten requests from Delphi and C++Builder users that they'd love to see a Community Edition of Delphi and C++Builder.  
For the first time ever, we are launching a full featured Community Edition. It is a path for new developers to experience the amazing capabilities of Embarcadero’s developer tools and rediscover Delphi. Nothing comes close to the satisfaction of building an app with the UI tools that we deliver and the app will be scalable and robust. Not only is it great for new developers, but our existing community can look forward to the next generation of knowledgeable Delphi developers picking up the torch and furthering their legacy with new Delphi projects.
This is also true for C++Builder, since Community Edition provides a great entry point for C++ developers around the world to experience all that C++Builder has to offer, especially in terms of our multi-platform capabilities.  
We hope you share our excitement by spreading the word about Community Edition.
We believe our Community Editions will attract and nurture the next generation’s interest in software development while providing them with professional-level tooling.
Provided free of charge to our community of freelance developers, startups, students and non-profits, Delphi and C++Builder Community Edition provide a full featured IDE for building iOS, Android, Windows and macOS apps from a single Delphi or C++ codebase (with a limited, commercial use license).  
Community Edition includes a code editor, powerful debugging tools, built-in access to popular local databases with live data at design time,  Bluetooth and IoT capabilities and much more. Community Edition will come with Delphi and C++Builder’s renowned visual frameworks and components to deliver pixel perfect styling for applications that can run natively on multiple platforms.
Who is Community Edition designed for?
Delphi Community Edition and C++Builder Community Edition provide developers with integrated and professional-level developer tools from Day 1. Community Edition is designed for freelance developers, startups, students and non-profits with annual revenues of less than USD $5000 or teams with up to 5 developers. Community Edition is licensed with a one year term license.
Am I Eligible for Delphi or C++Builder Community Edition?
If you're an individual you may use Community Edition to create apps for your own use and apps that you can sell until your revenue reaches $5,000 per year.
If you're a small company or organization without revenue (or up to $5,000 per year in revenue), you can also use Community Edition. Once your company's total revenue reaches US $5,000, or your team expands to more than 5 developers, you can move up to an unrestricted commercial license with Professional, Enterprise, or Architect Edition.
For more information on Community Edition, see the Community Edition Landing Page, our Eula and Community Edition FAQs.
In addition to releasing Community Edition, we're also providing updated 10.2.3 Tokyo builds for new purchases, trials, and customers on active Update Subscription.
The updated build includes the patches we've released since the original 10.2.3 release back in March. You can find more details here.
Helpful Links:
 

Read More

Learn to Program with Community Edition

$
0
0

Get started programming with our Community Editions! 

Community Edition is our full-featured and free IDE to build applications for iOS, Android, Windows and macOS from a single codebase using the robust and easy-to-learn Delphi language. It's the perfect way to get started learning a new programming language or explore multi-device app development. Embarcadero's Community Edition is available for Delphi and C++Builder.   

We'll use the same "calculator" sample application to demonstrate how to use Community Edition to develop an application in either C++ or Delphi. Each learning track contains five posts, and follow the same progression so you can switch back and forth if you want to see how the application is created in the other language. 

Ready to get started? 

Bonus Video: Installing the Community Edition IDE

Learn to Program with Delphi Community Edition (with Marco Cantu)

  1. Introduction and Installation to Delphi CE  
  2. Building and Debugging with Delphi
  3. Architecture and Layers of Code
  4. Designing user interfaces
  5. Putting the Calculator Together  

Learn to Program with C++Builder (with David Millington) this uses the retired Starter Edition and the series will be updated to show current Community Edition capabilities. Intermediate Level (some programming experience with C++ or another language) 

  1. Introduction and Installation  C++Builder
  2. Building and Debugging  C++Builder
  3. Architecture and Layers of Code C++Builder
  4. Smart pointers, Boost optional, and FMX styles
  5. Operators and Final application


The above tutorials may also be completed with our FREE 30-DAY TRIAL of RAD Studio or any of our paid editions. 

Community Edition is provided free of charge to developers and organizations with fewer than 5 developers and who have revenues less than $5000 USD and comes with a one-year term license and a limited commercial license. Looking for a perpetual license with an unrestricted commercial license? Learn about our Professional, Enterprise and Architect Editions of Delphi, C++Builder and RAD Studio


Read More

Podcast en Español - Community Edition

$
0
0

En NoSóloDelphi han regresado de las vacaciones "podacasticas" para hablar de esta importante noticia, el lanzamiento de "Community Edition".

En el Podcast cuentan algunos detalles correspondientes a ésta la nueva edición gratuita que Embarcadero ha lanzado con el fin de llegar a más personas, entre ellos estudiantes, emprendedores, curiosos y en sí todo el que desee.

Para mí esto marca un antes y un después en la historia de Delphi...

Para escuchar el episodio puedes entrar en https://nosolodelphi.com/34-asi-volvemos-con-delphi-community-edition/


Saludos,

Jhonny.


Read More

A vulkan header generator for Delphi.

$
0
0

What is darkVulkanGen?

A handful of months back, I began working on a game engine for Delphi named darkGlass.
see:

http://chapmanworld.com/darkglass/ https://github.com/chapmanworld/DarkGlass

At that time I’d intended to write the rendering part of the game engine using OpenGL, however, for a variety of reasons I decided to use Vulkan instead.

Vulkan is a modern graphics API maintained by the Khronos group (a non-profit organisation which collaborates with many of the major organizations across technology industries to provide cross platform standardization of API’s). They are also responsible for the OpenGL and OpenCL API’s.

The Khronos Group provides a specification for their Vulkan API in the form of an XML document and a set of scripts which transform the XML into documentation and a C/C++ header file. Unfortunately for us Delphi users, a C/C++ header is of little use, and so I needed a pascal equivalent of that header.

The approach I decided to take, was to parse the Vulkan API specification XML document (vk.xml) and use it to generate the pascal sources. This is what darkVulkanGen does.

It’s rough around those edges!

I’d like to stress, as I do in the video below, that this generator is a first draft. It works sufficiently to generate a header that compiles, but I can’t yet claim that header works. This is a work in progress, but should advance quickly, and so I’m sharing early.
If you are attempting to use the header now and find problems, please raise ‘issues’ on the darkGlass github repository.

For more information, please watch this video (and/or keep reading below).

Source code for the darkVulkanGen is contained within the darkGlass repository on GitHub: https://github.com/chapmanworld/DarkGlass

But isn’t there already a Delphi header generator for Vulkan?

Yes there is. It’s called pasVulkan and can be found on GitHub here: https://github.com/BeRo1985/pasvulkan
pasVulkan is more complete than darkVulkanGen, it has been around for longer, and has been used to generate an impressive set of demo applications. None the less, I decided not to use it, my reasons are all quite thin, but each added weight to the decision. Here they are:

pasVulkan is not just a header it’s a game engine in progress.
I’m already working on a game engine and therefore don’t need most of the pasVulkan code. pasVulkan uses a slightly different style of coding to my own. pasVulkan would have introduced the zlib license to my project. Third-party dependency.

I also noticed a minor bug in pasVulkan while using it’s output as a comparative reference for darkVulkanGen. I reported the bug and it was fixed almost immediately, however, had Benjamin Rosseaux not been so quick to respond, I’d have been forced to fork the project and study the code to repair it myself.

Getting the header.

In my video I describe how to get the source code for the header generator and use it to generate the header. In coming days this will not be necessary, as I’ll put a copy of the header into the darkGlass source. You’ll then be able to simply browse the GitHub repository and download that one file (and the darkDynLib directory it depends on). I’ll post an update here when that’s done.

Will it support Lazarus/FPC?

Possibly in the future yes, but certainly not in it’s present state.
The darkGlass project is for Delphi, and I work for Embarcadero. This means that I always have the latest version of Delphi available to me, and that makes supporting Lazarus and FPC a lower priority for me. Having said that, I’ve also used Lazarus and FPC quite heavily, and as a point of habit I tend to keep my code compatible with the syntax differences. So it’s not impossible that I’ll patch it up for FPC in the future, but that’s not happening today.

Today actually brings about another reason to lower my priority for FPC support.
Embarcadero officially released the Community Edition of Delphi and C++ Builder! https://www.embarcadero.com/products/delphi

The Community Edition of Delphi gives you all the same features that you get with the Professional Edition, but for FREE!
The Community Edition is intended for student, hobby, and start-up organizations and comes with license restrictions appropriate to it’s intended audience. However, if you fall into one of these categories, you get to write applications for Windows, Mac OSX, Android and IOS using a single code base, and single UI designer, at no cost!

Conclusion

I hope this header generator is useful to you.

Thanks for Reading!


Read More

Apresentando o Delphi e o C++ Builder Community Edition

$
0
0

Hoje é um dia muito emocionante para a nossa comunidade. Por muitos anos, recebemos solicitações de usuários do Delphi e do C++ Builder de que eles adorariam ver uma Community Edition do Delphi e do C++ Builder.

Pela primeira vez, estamos lançando uma Community Edition completa. É um caminho para novos desenvolvedores experimentarem as incríveis capacidades das ferramentas de desenvolvimento da Embarcadero e redescobrirem o Delphi. Nada chega perto da satisfação de criar um aplicativo com as ferramentas visuais que oferecemos e saber que o aplicativo será escalável e robusto. Não é ótimo apenas para novos desenvolvedores, mas também para nossa comunidade que poderá esperar por uma próxima geração de profissionais experientes em Delphi, os quais darão continuidade ao seu legado com novos projetos Delphi.

Isso também é verdade para o C++ Builder, já que o Community Edition fornece um ótimo ponto de entrada para desenvolvedores de C++ em todo o mundo para experimentar tudo o que o C++ Builder tem a oferecer, especialmente em termos de nossos recursos multiplataforma.

Esperamos que você compartilhe nosso entusiasmo divulgando o Community Edition.

Acreditamos que nossas Community Editions atrairão e estimularão o interesse da próxima geração no desenvolvimento de software a medida que os estamos municiando com ferramentas de nível profissional.

Fornecido gratuitamente à nossa comunidade de desenvolvedores freelancers, startups, estudantes e organizações sem fins lucrativos, o Delphi e o C++ Builder Community Edition fornecem um IDE completo para criação de aplicativos iOS, Android, Windows e macOS a partir de uma única base de código Delphi ou C++ (com uma licença de uso comercial limitada).

O Community Edition inclui um editor de código, ferramentas de depuração poderosas, acesso integrado a bancos de dados locais populares com dados em tempo de design, recursos de Bluetooth e IoT e muito mais. O Community Edition virá com os renomados frameworks e componentes visuais do Delphi e do C++ Builder entregando aplicativos que podem ser executados nativamente em múltiplas plataformas com um estilo visual perfeito.

https://community.embarcadero.com/uploads/397/Delphi_10.2.3_CE_Splash.png

https://community.embarcadero.com/uploads/397/C++_CE_Splash.png

Para quem o Community Edition foi projetado?

O Delphi Community Edition e o C++ Builder Community Edition fornecem aos desenvolvedores ferramentas de desenvolvedor integradas e de nível profissional. O Community Edition é projetado para desenvolvedores freelance, startups, estudantes e organizações sem fins lucrativos com receita anual inferior a US$ 5000 (ou equivalente em moeda local) e equipes com até 5 desenvolvedores. O Community Edition é licenciado com uma licença válida por um ano.

Sou elegível para o Delphi ou o C++ Builder Community Edition?

Se você for um autônomo, poderá usar o Community Edition para criar aplicativos para seu próprio uso ou aplicativos que podem ser vendidos até que sua receita alcance US$ 5.000 (ou o equivalente em moeda local) por ano.

Se você for uma pequena empresa ou organização sem receita (ou até US$ 5.000 por ano em receita), também poderá usar o Community Edition. Quando a receita total da sua empresa atingir US$ 5.000, ou sua equipe se expande para mais de cinco desenvolvedores, você pode migrar para uma licença comercial irrestrita como a  Professional, Enterprise ou Architect Edition.

Para obter mais informações sobre o Community Edition, consulte a página principal do Community Edition, o Eula e nossas perguntas frequentes sobre o Community Edition.

Novos builds do 10.2.3 Tokyo

Além de lançar o Community Edition, também estamos disponibilizando builds atualizados do 10.2.3 Tokyo para novas compras, testes e clientes que estão com seus contratos de manutenção vigentes. A versão atualizada inclui os patches que lançamos desde a versão 10.2.3 original em março. Você pode encontrar mais detalhes aqui.

Links úteis

Delphi Community Edition Landing Page

C++Builder Community Edition Landing Page

Community Edition Docwiki Page

Updated Feature Matrix

Community Edition Eula

Updated 10.2.3 Tokyo Release Docwiki Page

Moving from Community Edition to other editions


Read More

Embarcadero launches Delphi Community Edition

$
0
0

The release of Delphi Community Edition is fantastic news for the Delphi language, the developer community, the partners, and the entire ecosystem. We hope it will help new developers (students, hobbyist, open source developers, and someone starting with mobile store publishing, among others) adopt Delphi for their Windows, Mac and mobile development. 

This new version is a big leap forward from the Starter edition, as it offers the full FireMonkey and FireUI multi-device development experience, plus a fully working IDE, basic database access, including even IBLite for mobile. 

Needless to say I've been involved in the process of making this happen, among many others in the company, and I'm very happy this is now a reality. If you are not a professional developer, enjoy it. If you are a professional developers, spread the work about Delphi Community Editions to other developers, students, schools, teachers, hobbyist, and anyone else who could be interested and help us grow the Delphi developers community.

Long live to Delphi!

PS. In the meantime we are also released a new build of Delphi 10.2.3, but if you already have 10.2.3 and have downloaded the various patches you won't need to update. Trying to minimize the uninstall/install annoyance when possible.


Read More

Presentando Delphi y C++ Builder Community Edition

$
0
0

Hoy es un día muy emocionante para nuestra comunidad. Durante muchos años, hemos recibido solicitudes de los usuarios de Delphi y C++ Builder que le gustaría ver a una Community Edition de Delphi y C++ Builder.

De manera inédita estamos lanzando una Community Edition completa. Es un camino para que nuevos desarrolladores puedan experimentar las increíbles capacidades de las herramientas de desarrollo de Embarcadero y redescubrir Delphi. Nada se compara con la satisfacción de crear una aplicación con las herramientas visuales que ofrecemos y saber que la aplicación será escalable y robusto. No sólo es óptimo para los nuevos desarrolladores, pero también para nuestra comunidad que podrá esperar a una próxima generación de profesionales experimentados en Delphi, que continuarán su legado con nuevos proyectos Delphi.

Esto también es válido para C++ Builder, como la Community Edition ofrece un buen punto de entrada para los desarrolladores de C ++ de todo el mundo para experimentar todo lo que C++ Builder tiene que ofrecer, especialmente en términos de nuestros recursos multi-plataforma.

Esperamos que usted comparte nuestro entusiasmo divulgando el Community Edition.

Creemos que nuestras Community Editions van a atraer y estimular el interés de la próxima generación en el desarrollo de software a medida que los estamos equipando con herramientas de nivel profesional.

Ofrecido gratuitamente a nuestra comunidad de desarrolladores freelance, startups, estudiantes y organizaciones sin fines de lucro, el Delphi y C++ Builder Community Edition proporcionan un IDE completo para la creación de aplicaciones de iOS, Android, Windows y macOS desde una única base de código de Delphi o C++ (con una licencia de uso comercial limitada).

Community Edition incluye un editor de código, herramientas de depuración de gran alcance, acceso integrado a bases de datos locales populares con datos en tiempo de diseño, características de Bluetooth e IoT y mucho más. Community Edition vendrá con los renombrados frameworks y componentes visuales de Delphi y de C ++ Builder entregando aplicaciones que se pueden ejecutar nativamente en múltiples plataformas con un estilo visual perfecto.

https://community.embarcadero.com/uploads/397/Delphi_10.2.3_CE_Splash.png

https://community.embarcadero.com/uploads/397/C++_CE_Splash.png

¿Para quién se ha diseñado el Community Edition?

Delphi Community Edition y C++ Builder Community Edition proporcionan a los desarrolladores herramientas de desarrollo integradas y de nivel profesional. Community Edition está diseñado para desarrolladores freelance, startups, estudiantes y organizaciones sin fines de lucro con ingresos anuales inferiores a US$ 5000 (o equivalente en moneda local) y equipos con hasta 5 desarrolladores. Community Edition se licencia con una licencia válida por un año.

¿Soy elegible para Delphi o C ++ Builder Community Edition?

Si es un autónomo, puede utilizar Community Edition para crear aplicaciones para su propio uso o aplicaciones que pueden venderse hasta que su ingreso alcance US$ 5.000 (o el equivalente en moneda local) al año.

Si usted es una pequeña empresa u organización sin receta (o hasta $ 5.000 por año en ingresos), también puede utilizar Community Edition. Cuando el ingreso total de su empresa alcanza los $ 5.000, o su equipo se expande a más de cinco desarrolladores, puede migrar a una licencia comercial  como Professional, Enterprise o Architect Edition.

Para obtener más información acerca de Community Edition, consulte la página principal de Community Edition, Eula y nuestras preguntas más frecuentes sobre Community Edition.

Nuevos builds del 10.2.3 Tokyo

Además de lanzar el Community Edition, también estamos ofreciendo builds actualizados del 10.2.3 Tokyo para nuevas compras, pruebas y clientes que están con sus contratos de mantenimiento vigentes. La versión actualizada incluye los parches que lanzamos desde la versión 10.2.3 original en marzo. Usted puede encontrar más detalles aquí.

Enlaces importantes

Delphi Community Edition Landing Page

C++Builder Community Edition Landing Page

Community Edition Docwiki Page

Updated Feature Matrix

Community Edition Eula

Updated 10.2.3 Tokyo Release Docwiki Page

Moving from Community Edition to other editions


Read More

Delphi и C++Builder Community Edition (CE) - расширение редакций популярных профессиональных инструментов

$
0
0

Привычно ждать чудес перед новым годом, а не в разгар лета! Зато какой приятной неожиданностью станет эта новость для очень многих наших пользователей!

Компания Embarcadero решила пойти на смелый шаг и выпустить еще одну редакцию популярных во всем мире инструментов быстрой разработки нативных кроссплатформенных приложений Delphi и CBuilder. Созданная  в ответ на предложения интернационального сообщества разработчиков, она получила название Community Edition (CE). Может не слишком оригинально, зато точно!  С этого момента редакция CE заменяет в поставках редакцию Starter - сильно урезанную и по возможностям разработки, и по элементам среды, с жестко ограниченной лицензией, которая была предназначена только для создания приложений для MS Windows и не давала возможности мобильной разработки.

Впервые в истории компании, мы запускаем Community Edition, аналогичную по возможностям редакции Professional 10.2.3 и предоставляющую возможности разработки для разных платформ, включая 32/64-бит Windows, OSX, iOS и Android.  Эта новая редакция является большим шагом вперед по сравнению со Starter, поскольку включает поддержку FireMonkey и отладки на разных устройствах FireUI, одновременно со всеми возможностями IDE, стандартным доступом к БД, включая IBLite.  Блог-пост на английском

Казалось бы мы, в компании Embarcadero, должны быть опечалены, но нет: мне очень приятно сообщить,  что новая редакция CE бесплатна для скачивания и использования для практически всех пользователей. Мы надеемся, что ее оценит множество разработчиков - опытных и новых: учащихся, студентов, некоммерческих и open source разработчиков, стартапов и индивидуальных разработчиков для магазинов приложений.

Внимание! Лицензия для CE имеет существенные условия и ограничения на использование этой редакции, хотя и значительно облегченные, по сравнению со Starter!

Подробнее о новой редакции, составе, возможностях и форме выпуска, условиях использования и лицензионных правилах, для кого она предназначена, и кто не сможет ей воспользоваться, мы расскажем на вебинаре, который состоится в четверг 26 июля в полдень по московскому времени.

Новая редакция доступна для скачивания. Чтобы скачать и установить Delphi или CBuilder Community Edition, нужно зайти на сайт Embarcadero на страницу

войти в свою учетную запись EDN (или зарегистрироваться, если нет учетной записи) и получить на указанный адрес email персональный ключ регистрации и ссылку для скачивания дистрибутива. 

Пожалуйста, примите во внимание (и не говорите потом, что вас не предупреждали!) :

  • В момент установки редакции CE требуется интернет-связь с сайтами Embarcadero.
  • Нельзя устанавливать CE на тот же компьютер, где уже установлена другая редакция Delphi/CBuilder той же версии 10.2! CE заменит ее лицензии на свою!


Read More

Celebrating Five Amazing Years with Embarcadero

$
0
0

This month I am celebrating my five-year anniversary with Embarcadero Technologies. It’s been an amazing adventure and I am looking forward to more. I saw a graphic similar to the following today and it reminded me how great it is to be doing what I am doing (plus I love Venn diagrams).

Loving what I do at Embarcadero

I truly do love what I am doing, and I love the people I work with. Everyone I work with inside Embarcadero is amazing, plus I get to work closely with the MVPs, Tech Partners, and all the amazing members of the community. Most of what I do is stuff I used to do as an MVP before coming to Embarcadero. It was essentially my hobby. I would even take vacation time and spend my own money to travel to speak at conferences.

I frequently talk to developers who express their appreciation of the work I do as a developer advocate – I love training and sharing what I know. Not to mention all the gratitude I hear from developers for the productivity they get from Embarcadero’s tools. The reality is Embarcadero’s tools help developers make the world a better place.

RAD Studio speaks AndroidI started right before the release of RAD Studio XE5 in 2013, which added support for Android. iOS and macOS were great, but once RAD Studio had Android it was a gamechanger. So many people just added Android as a target to their iOS apps, made a few layout tweaks, and they had a native Android app!

Since then we’ve added so many great features, plus Linux and the new Free Community Edition!

When it comes to monetary pay I’m really looking for a way to take care of my family. Beyond that, my job pays a lot in satisfaction because I believe in what I do. It certainly helps that Software Developer was rated the #1 job this year. I’m not directly a developer, but software development is a big part of my job, and I work with a lot of amazing developers.


It’s been an amazing five years. Despite a few bumps I am so happy for where we are going, what I do here, and where Delphi, RAD Studio, and Embarcadero are headed. It is always rough when you go through a merger, but the new Community Edition is a direct result of the changes in philosophy that Idera brought. And now I get to work with Sencha, RanorexGurock, and others that make up the Idera family.

I’m looking forward to many more years doing what I love here with Embarcadero!

ILoveDelphi


Read More

Secrets Of FireDAC: Dynamic Where Clause Using Conditional Substitution Macros

$
0
0

If you are using FireDAC and building your SQL queries manually you may be using more verbose code than is needed. FireDAC has a feature called Macros which allows you to do a variable substitution in your SQL query similar to parameter substitution but for raw SQL. However, in addition to macro substitution you can combine it with conditional substitutions which lets you do the real magic.

If you are building your SQL query from scratch using strings you probably have some logic that decides whether to show the WHERE clause or not. With SQL you can't have a blank WHERE clause which leaves you writing some logic to handle that. FireDAC allows you to handle this situation very elegantly by using a conditional substitution IF statement within your SQL string.

Instead of concatenating your SQL string together you can simply write {IF !Where} WHERE !Where {FI} in your SQL statetment and then assign the macro using AsRaw (see below).

// If user entered some condition into Edit1, then the content will be substituted into SELECT WHERE
FDQuery1.SQL.Text := 'SELECT * FROM Customers {IF !Where} WHERE !Where {FI}';
FDQuery1.MacroByName('Where').AsRaw := Edit1.Text;
FDQuery1.Open;


[YoutubeButton url='https://www.youtube.com/watch?v=wS1A3v5_l98']


Read More

Embarcadero lanza ediciones Community gratuitas de C++Builder y Delphi

$
0
0

HOUSTON – XX de julio de 2018 – Embarcadero (una división de Idera, Inc.), proveedor de herramientas de productividad para desarrolladores de aplicaciones multiplataforma, anunció hoy la disponibilidad de ediciones Community gratuitas de sus productos C++Builder y Delphi, para que acceder a herramientas de desarrollo de aplicaciones de calidad sea más fácil para los aspirantes a desarrolladores y aquellos que deseen aprender nuevas habilidades.

Diseñada para desarrolladores independientes, empresas emergentes, estudiantes y organizaciones sin fines de lucro con ingresos menores a $5000 dólares, la Community Edition es un IDE con todas las funciones para crear aplicaciones iOS, Android, Windows y macOS a partir de un código fuente Delphi o C++. Incluye un editor de código, potentes herramientas de depuración, acceso integrado a bases de datos populares con datos en tiempo real en tiempo de diseño, funcionalidad Bluetooth y de IoT y un diseñador visual de UI con soporte para diseño de píxel perfecto y específico para la plataforma.

"El lanzamiento de Delphi y C++Builder Community Editions representa un hito significativo para nuestra creciente comunidad de desarrolladores", dijo Atanas Popov, gerente general de Embarcadero. "Ahora, muchos más aspirantes a desarrolladores de todo el mundo pueden conocer la potencia de Delphi y C++Builder para crear aplicaciones nativas que funcionan igual de bien en equipos móviles y de escritorio. Esto, junto con la facilidad de aprender diseño visual y cientos de componentes disponibles previamente probados, realmente transformará nuestra comunidad para el crecimiento futuro. Es el momento ideal para ser desarrollador Delphi o C++."

Si bien las ediciones comunitarias de otros IDE ofrecen términos de licencia similares, ninguno cuenta con el amplio soporte de lenguaje y el conjunto de características que ofrecen Delphi y C++Builder, lo cual fomenta el desarrollo de proyectos de código abierto pero permite un uso comercial limitado.

Otros beneficios de la Community Edition son:

      Gratuidad para organizaciones de hasta cinco desarrolladores o hasta alcanzar los $5000 dólares de ingresos

      IDE integrado que proporciona un único entorno donde diseñar, codificar, depurar, probar e implementar aplicaciones multiplataforma

      Un solo código fuente y una UI maestra que se puede personalizar fácilmente según la plataforma de destino, ya sea Windows, macOS, iOS, Android o Linux; esto garantiza aplicaciones multidispositivo más rápidas de desarrollar y más fáciles de mantener

      Diseñador visual integrado y cientos de componentes precompilados que agilizan el diseño de prototipos y aplicaciones, incluso para desarrolladores sin experiencia en diseño

Para obtener más información o descargar su Starter Edition gratis, visite C++Builder Community Edition: https://www.embarcadero.com/products/cbuilder/starter; o Delphi Community Edition: https://www.embarcadero.com/products/delphi/starter


Acerca de Embarcadero

Embarcadero proporciona herramientas para solucionar problemas de productividad para los desarrolladores de aplicaciones. Los productos de la compañía permiten a los usuarios diseñar, crear y ejecutar aplicaciones a partir de un único código fuente para todas las plataformas. Una comunidad de más de tres millones de usuarios de C++ y Delphi confían en los productos galardonados de Embarcadero para entregar aplicaciones empresariales críticas. Embarcadero es una división de Idera, Inc. Para más información, visite www.embarcadero.com.

###


Read More

Delphi Community Edition

$
0
0

La comunidad Delphi llevaba tiempo demandando esta versión de Delphi y finalmente Embarcadero se ha decidido a dar ese paso. Hace tiempo que disfrutábamos de la versión Starter, pero con la “Delphi and C++Builder Community Edition” se da un paso más.

Se podrá disfrutar de una versión completa, con desarrollo multiplataforma (Windows, Android, iOS y macOS), acceso a Bases de Datos, IoT y el resto de características necesarias para desarrollar con una versión completa.

Delphi_10.2.3_CE_Splash

Según la web de embarcadero, esta versión está enfocada a desarrolladores independientes, startups, estudiantes y organizaciones sin fines de lucro con ingresos anuales menores a 5000$ o equipos con hasta 5 desarrolladores.  Es decir, que podemos instalar y utilizar esta versión para aplicaciones de uso propio o incluso para venderlas si nuestros ingresos por ellas no superan esos 5000$.

Personalmente creo que es una gran noticia; La única pega tal vez sea que ha llegado un poco tarde, pero eso no quita que sea algo bueno.  Disponemos de una versión Profesional completa de libre descarga y uso para todos aquellos que quieran trabajar con ella y conocerla.

Aquí tenéis la comparativa entre las diferentes versiones (incluida la Community) que distribuye ahora Embarcadero.

Si queréis conocer todos los detalles de esta versión, aquí tenéis en enlace a la página Community Edition FAQs, donde tenéis todos los detalles comerciales, de licencia, de uso,… referentes a esta versión.

Página de presentación y descarga.

Aquí os dejo también a la página en la docWiki de Embarcadero. Podéis encontrar aquí detalles más técnicos sobre la descarga, instalación, activación,…


Read More

Delphi Community Edition (Recopilación de Links)

$
0
0

Algunos enlaces a Blogs y Webs de compañeros de la comunidad; Añado también algunos enlaces a páginas de Embarcadero con datos de la versión.

2018-07-19 08_15_32-000184


Read More

Новая сборка 10.2.3

$
0
0

Пользователи Embarcadero привыкли, что расширение возможностей, выпуск новых версий также сопровождается исправлением очередной порции багов и недочетов из списка на Quality.embarcadero.com. Это связано с выпуском новой сборки дистрибутива - проверки, упаковки и размещении на сайте сразу двух вариантов инсталлятора - WEB и ISO. В связи с выпуском новой редакции Community Edition оба этих дистрибутива также были обновлены, несмотря на то, что версия продуктов осталась той же - 10.2.3.

С момента первоначального выпуска этой версии было также выпущено несколько отдельных патчей, которые выпускаются в исключительных случаях для быстрого приведения в порядок какого-то важного элемента нашего набора инструментов.

  • RAD Server 10.2.3 Performance Patch (July 13th, 2018)
  • iOS 11.3 and CodeInsight Patch (June 26th, 2018)
  • Delphi - RAD Server Linux Apache Patch (May 17th, 2018)
  • iOS 11.3 Patch (May 8th, 2018)
  • C++Builder - C++ Compiler 4k Stack Allocation Patch (April 17th, 2018)
  • Context Help Patch (April 9th, 2018)
  • EMS Package Wizard Patch (March 27th, 2018)
  • Android Push Notification Patch (March 27th, 2018)

Подробнее обо всех обновлениях в последнем дистрибутиве можно прочитать в документации на сайте:  http://docwiki.embarcadero.com/RADStudio/Tokyo/en/10.2_Tokyo_-_Release_3  

Каждый патч из этого списка был доступен по отдельности для скачивания и установки пользователям с действующей подпиской на обновления. 

Пользователям, которые устанавливали все перечисленные патчи по мере их выхода нет необходимости переустанавливать свои инструменты из нового дистрибутива, но при желании и наличии достаточного времени могут это сделать. 

RAD Studio 10.2.3 Tokyo, build 3231 доступен в двух вариантах - Web (Feature Installer) или ISO; для Community Edition доступен только Web вариант дистрибутива. Установка новой сборки потребует предварительного полного удаления более раннего варианта. Для более надежного сохранения имеющихся настроек и установленных дополнительных компонент, настоятельно рекомендуется применять установщик того же типа, что и для предыдущего установленного варианта. Если в главном меню IDE список Tools содержит пункт "Manage Platforms", значит был использован Web-инсталлятор; в случае ISO этот пункт отсутствует.


Read More

Instantly expose a table as a REST endpoint – again.

$
0
0

Introduction

A while back I wrote a component for exposing FireDAC tables as REST endpoints in Delphi. I wasn’t entirely happy with the component that I’d written, however, it was really intended as a proof of concept. I was quite surprised to learn that people were actually making use of that component, rather than simply using it as an example of what could be done.

Fast-Forward a couple of years, and I found myself needing precisely that component in another project. I wasn’t going to make use of my proof-of-concept code, knowing it to have some flaws, and so I decided to have a do-over. Today, I’d like to introduce you to the deREST components: https://github.com/chapmanworld/deRest 

deREST

The deREST components are my replacement for the older component which was named JCRUD.

As with the original component, I still maintain my disclaimer: “I will not be held responsible for any damages that occur due to the use or misuse of this component.”, however, unlike the original component I do intend to maintain deREST going forwards.

In the video below, I explain more about the component set, my intentions regarding maintenance, and how to make use of it. I also give a few hints as to my intended road-map for deREST.

(Apologies for the video being a little choppy in places, just where I edit out some gafs…)

deREST is licensed MIT https://github.com/chapmanworld/deRest/blob/master/LICENSE

Conclusion

I hope these components are useful to you.
Feel free to get in touch with suggestions for improvement!

Thanks for Reading / Watching!


Read More

Delphi CE ve C++ Builder CE TOPLULUK SÜRÜMLERİ YAYINLANDI

$
0
0
Delphi CE (Community Edition) ve C ++ Builder CE Topluluk Sürümleri yayınlandı. Geliştiricilere ilk günden entegre ve profesyonel düzeyde geliştirici araçları sağlayor. CE Topluluk Sürümünü kimler kullanabilir:
- ücretsiz geliştiriciler,
- yeni başlayanlar,
- öğrenciler,
- ve kar amacı gütmeyen kuruluşlar için 5000$dan daha az gelir olan ekipler ve en fazla 5 geliştiricili startuplar.
CE Sürümü bir yıllık dönem lisansıdır.
 
İlgili formu doldurup Delphi ve C++ Builder'ın Pro sürümü gibi yazılımlarınızı yukarıdaki şartlar altında geliştirebiliyorsunuz.
 
 
Formu doldurup yazılımı indirmeniz yeterli. Yeni başlayanlar ve startup'lar Windows,MacOS, Android ve iOS'da tek bir kodla geliştirmek için kaçırılmayacak bir firsat, değerlendirin derim.

Read More

Free Field Service App Template Solution Quick Start Guide For Android, iOS, macOS, and Windows

$
0
0

The RAD Server Field Service Template consists of three main components and a setup application (also check out the deep dive). The Field Service Admin app has been tested on Windows and macOS (but probably also runs on Android and iOS). The Field Service App has been tested on Android, iOS, macOS, and Windows. The Field Service Setup has been tested on Windows. The Field Service Server has been tested on Windows but may also run on Linux. This is an excerpt from the RAD Studio Field Service Template quick start guide. You can download the Field Service Template from Embarcadero GetIt. The three main components of the Field Service template(plus the setup) are:


  • Field Service Admin

  • Field Service App

  • Field Service Server (RAD Server)

  • Field Service Setup


The RAD Server Field Service project contains REST endpoints which the Field Service Admin and Field Service App connect to. It utilizes InterBase on the back end for its database storage. The Field Service Setup app will set up your Field Service database and connect to your existing RAD Server database. It will create 3 user accounts and load the database with sample data. You will also need to retrieve a free IBLite license file and add it to your InterBase directory for the Field Service App.


I. Configure RAD Server


Step 1:

You will first need to set up your development RAD Server. You can read the directions here:

http://docwiki.embarcadero.com/RADStudio/Berlin/en/Running_the_EMS_Server_or_EMS_Console_Server_on_a_Developer_Environment


You will then need to configure your RAD Server to support multi-tenants before you launch the setup application. You should configure your emsserver.ini file to contain the following setting to enable multi-tenant support:


[Server.Tenants]

MultiTenantMode=1


You need 3 user account spaces available (the developer server limits you to 5 user accounts). The default tenant 1 used in the setup is as follows with a password of "secret":

00000000-0000-0000-0000-000000000001


Step 2:

Open the FieldServiceServer project and configure the path to your RAD Server (EMS) database and your field service database in the TFDConnection component in both DataModules. The default path in the setup app will be C:\Users\Public\Documents\Embarcadero\EMS\FIELDSERVICE.IB


Step 3:

Run the project to deploy your edge module into the RAD Server (EMS) Development Server.


II. Launch the Field Service Setup

Once this is complete you should open and run the Field Service Setup app. You will move through each step first configuring the location of the databases, then creating the user accounts, and finally creating the tables in the database and loading them with the sample data.


Step 1:

You will need to set a path to your field service database. It will be created if it does not exist. The default is:

C:\Users\Public\Documents\Embarcadero\EMS\FIELDSERVICE.IB


You will need to set a path to your EMSServer database. The default is:

C:\Users\Public\Documents\Embarcadero\EMS\EMSSERVER.IB


Step 2:

The three accounts that are created are manager1, technician1, and technician2. The passwords should all be “password” which you can use to log in to the Field Service Admin and Field Service App after setup.


When you run Setup Users no user account should be required.


Step 3:

Press the Initialize All button to create the InterBase database using the three tables listed and fill them with sample data.


Step 4:

You should be able to view the sample data that was inserted into the database on Step 4. You shouldn’t need to change anything here but you could come back later and Reset the data if needed.


Step 5:

Locate the IBLite registration file that you download from the Product Registration Portal. It may be in your Downloads directory by default. The filename will be similar to regXXXX_XXXXXXXX.txt where the X's are numbers. The file will ultimately need to be named reg_iblite.txt.


Once you locate the file you can use the Install License button in the Setup app to copy it to:

C:\Users\Public\Documents\Embarcadero\InterBase\redist\InterBase2017


At this point the tenants, users, database, tables, and data should now be setup for the template.


III. Field Service App


Step 1:

Open the FieldServiceApp project.


Step 2:

Configure the EMS_SERVER and EMS_PORT const in uMainForm.pas to point at your development server. The default is localhost 8080.


Optionally you can get the Google Maps API keys and insert them into the const section as well.


Get an API key from here https://developers.google.com/maps/documentation/embed/get-api-key

and place it in the GOOGLE_MAPS_EMBED_API_KEY const. This key will allow you to open a real time map of the appointment and history locations.


Get an API key from here https://developers.google.com/maps/documentation/static-maps/get-api-key and place it in the GOOGLE_MAPS_STATIC_API_KEY const. This key will allow you to view static map images on the detail tabs of the appointments and history.


Step 3:

Run the project to deploy your client to Windows. You should be able to select your tenant, log into a technician user account, and interact with the sample data.


Overview

Login Page

  • Allows a technician to login to the Field Service system - optionally choosing to authenticate to a specific instance.


Appointment Page

  • Allows a technician to view appointments assigned to their user.  Appointments are sorted by next scheduled appointment.

  • Additional information may be obtained by clicking on a specific appointment.

  • Specific appointments may be marked as completed when finished.


History Page

  • Shows appointments marked as completed.


Parts Page

  • A list of parts from the server.  Shows the name, a photo, quantity, and the location of each part.


Profile Page

  • Shows information about the currently logged in user.


Notification Page

  • Shows notifications of new jobs recently assigned to the current user.

  • Notifications may be clicked on to display the record details.  Once clicked, the notification is considered read and disappears.


Data Sync Page

  • Shows information about the last synced date for the data.

  • Allows a user to sync data when they are online.


IV. Field Service Admin


Step 1:

Open the FieldServiceAdmin project.


Step 2:

Configure the EMS_SERVER and EMS_PORT const in uMainForm.pas to point at your development server. The default is localhost 8080.


Optionally you can get the Google Maps API keys and insert them into the const section as well.


Get an API key from here https://developers.google.com/maps/documentation/geocoding/get-api-key and place it in the GOOGLE_GEOCODING_API_KEY const. This key will allow you to convert addresses to latitude and longitude.


Step 3:

Run the project to deploy your client to Windows. You should be able to select your tenant, log into a manager user account, and interact with the sample data.


Overview

Login Page

  • Allows an admin to login to the Field Service Admin system - optionally choosing to authenticate to a specific instance.


Appointment Page

  • Allows an admin to create/update/delete appointments and assign them to specific technicians.  Appointments are sorted in date descending order.

  • Appointments are searchable by customer.

  • Edit an appointment by clicking on it.

  • Specific appointments may be deleted.


History Page

  • Shows all appointments marked as completed.

  • Additional information may be obtained by clicking on an appointment.


Parts Page

  • A list of parts from the server.  Allows an admin to manage the name, a photo, quantity, and the location of each part.


User Page

  • Allows an admin to manage system user and set their permissions.


Data Sync Page

  • Shows information about the last synced date for the data.

  • Allows a user to sync data when they are online.


[YoutubeButton url='https://www.youtube.com/watch?v=cT5tiPDPh3c']


Read More

IBLite 2017 の GetIt パッケージが更新され、ライセンスファイルが付属しました

$
0
0

この記事は、MARCO CANTUによるUpdated IBLite 2017 GetIt Package With License Fileの抄訳です。

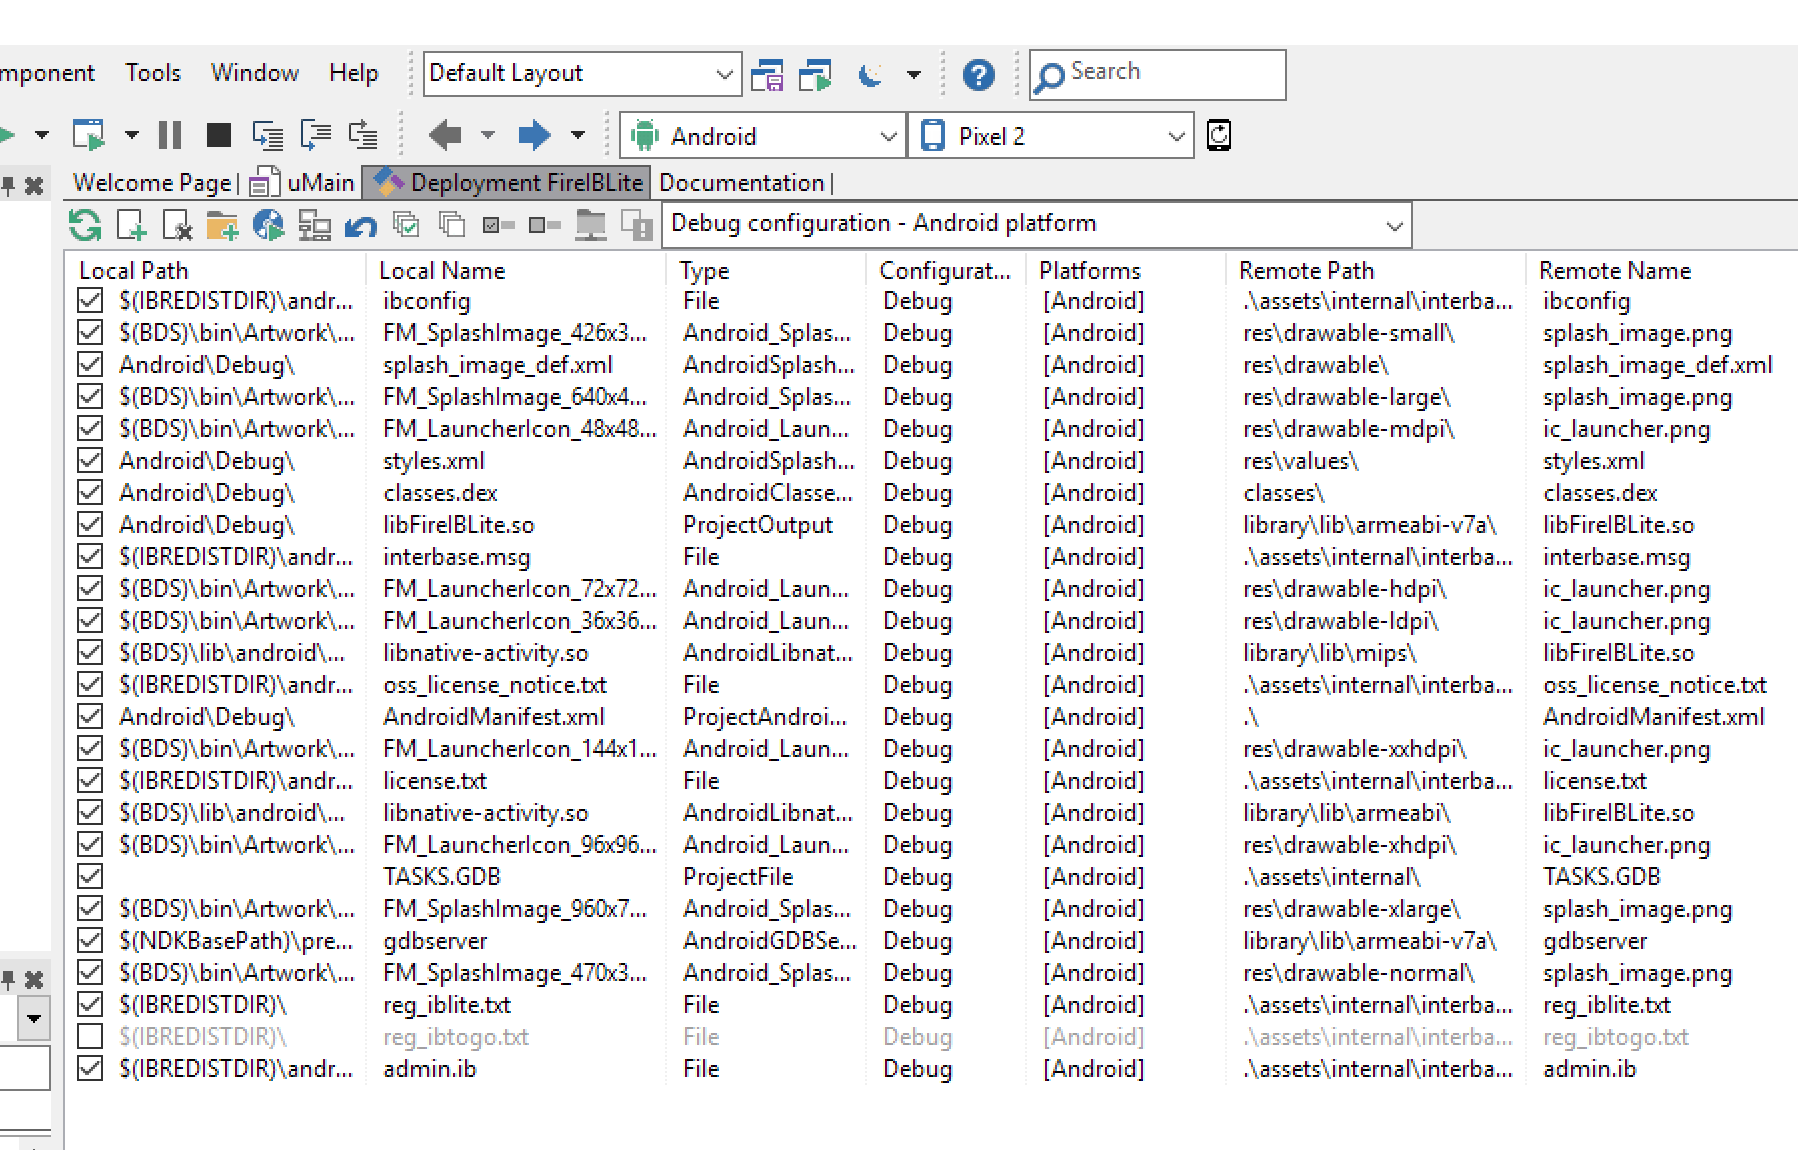
IBLiteは、モバイルアプリケーションとデスクトップアプリケーションに組み込むことのできる、InterBaseデータベースのローカルバージョンです。 RAD Studioは完全なデプロイメントをサポートしているので、必要なファイルをデバッグ用とストア用の両方のアプリケーションに簡単にデプロイできます(下の画像を参照してください)。 IBLiteは、一般的に使用されているSQLiteと比較して、より多くの機能を提供し、より堅牢なモバイルデータベースです。 また、InterBaseサーバーと完全に互換性があります。(RAD Studioに付属の無料の開発者用エディションも同様です。)

最近まで、IBLiteのデプロイには一意のライセンスファイルが必要でした。 開発者は、RAD Studioのシリアル番号と共に受け取ったIBLiteのシリアル番号と登録コードを、EmbarcaderoのWebサイトに入力して、IBLiteライセンスファイルをダウンロードします。

このファイルをアプリケーションのInterBaseの再配布可能なフォルダに追加します。そうでない場合は"product INTERBASE is not licensed."というランタイムエラーメッセージが表示されます。


 Embarcaderoは、RAD Studio 10.2 TokyoのIBLite / IBToGo GetItパッケージを更新しました。 これには、IBLiteのライセンスファイルが含まれます。そのため、ライセンスの交換やその他の手順は不要です。 IBLite搭載アプリケーションを構築して、自動配置ファイルセットを使用して、組み込みデータベースを備えたアプリケーションをモバイルデバイスにデプロイするだけです。

以下は、RAD Studioに同梱されているデモのうち、Androidへの配置設定の例です。

 この変更で、プロジェクトでIBLiteを使用し始めるのが、より簡単になり、無料で(!)InterBaseのパワーをモバイルアプリケーションに組み込むことが出来るようになりました。


Read More
Viewing all 1683 articles
Browse latest View live


<script src="https://jsc.adskeeper.com/r/s/rssing.com.1596347.js" async> </script>